How to integrate Apple Pay into your iOS app (Swift)
In this article, we are describing in details how to integrate Apple Pay into an iOS app. We'll code in the latest version of Swift and the code samples are extracted from our beautiful app templates, many of which have built-in support for Apple Pay. Feel free to download them directly, if you want to skip the hassle of learning how to integrate Apple Pay by yourself.
Apple Pay was a game changer! Besides reducing immense friction when it comes to payments in physical stores, it also simplifies check out forms, facilitating in-app purchases of physical goods, such as clothing or groceries, as well as services (such as hotel bookings, tickets purchasing, gym memberships, etc).
-
Configure your environment, by creating a merchant ID with Apple as well as a Payment Processing certificate. You can achieve all the steps required for these by following Apple’s detailed instructions. Once you’ve completed all those instructions, go to step 2. Make sure you’re generating a certificate file and you open it in your Keychain Access.
-
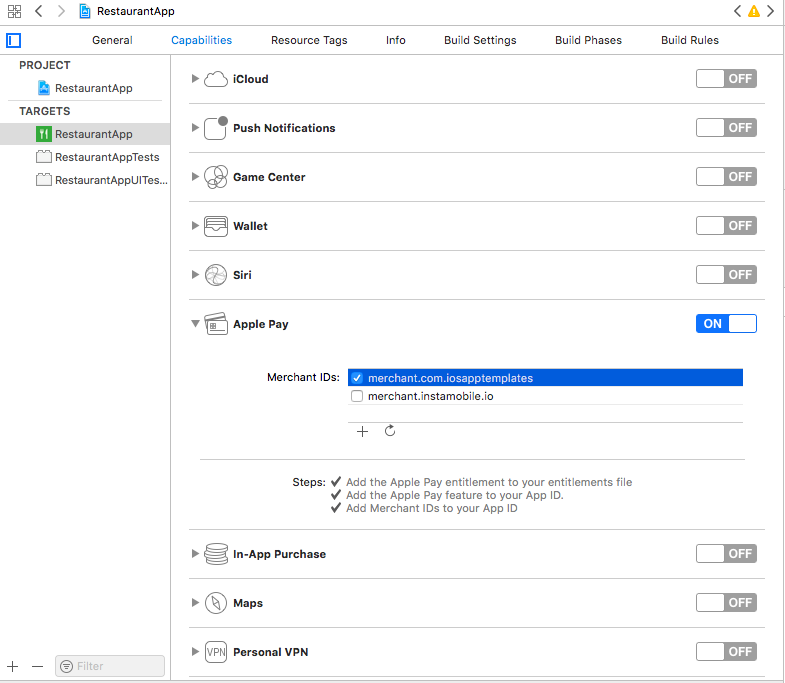
Add Apple Pay Capability to your Xcode project To enable Apple Pay for your app in Xcode, you need to open up the Capabilities pane. Turn on the switch in the Apple Pay row, and then input the merchant IDs you want to be used in the app. Make sure it matches the exact merchant ID you’ve created on the previous step. It should already be there, fetched automatically. If it’s not, try to sign-in into your Apple developer’s account, within Xcode. Here’s how the Capabilities setup looks like for your Restaurant App Template:
- Initialize and configure a Payment Request Initialize a PKPaymentRequest object. All the APIs live in the PassKit framework, provided by Apple, which needs to be imported into your files. You can specify a lot of relevant information on the payment request, such as:
- Country Code
- Currency Code
- Supported Payment Networks (such as Visa, Master Card, American Express, etc)
- Merchant ID
- Required billing contact fields
- Required shipping contact fields
- Available shipping methods And many others. Check out the definition of PKPaymentRequest for the full list of features.
Mega Bundle Sale is ON! Get ALL of our React Native codebases at 90% OFF discount 🔥
Get the Mega Bundle-
Present the view controller Once you’ve successfully initialized a payment request, you can use it to instantiate a PKPaymentAuthorizationViewController, which will take care of displaying the Apple Pay UI as well as authorizing the payment. All the interactions with the user are being managed by this view controller, so there’s no more extra work for you.
-
(Optional) Subscribe to payment events via PKPaymentAuthorizationViewControllerDelegate. You can implement the methods in this protocol if you want granular notifications for what the user is doing. You have triggers for when the authorization finishes, shipping method changes, shipping contact updates, shipping address changes, payment method selections, etc. Check out the interface of the protocol to see what extra information Apple Pay provides for developers.
As a bonus, here’s our open-source Swift class that manages Apple Pay mechanism in all of our iOS templates:
//
//  ATCApplePayManager.swift
//  RestaurantApp
//
//  Created by Florian Marcu on 6/26/18.
//  Copyright © 2018 iOS App Templates. All rights reserved.
//
import PassKit
class ATCApplePayManager: NSObject {
    let currencyCode: String
    let countryCode: String
    let merchantID: String
    let paymentNetworks: [PKPaymentNetwork]
    let items: [PKPaymentSummaryItem]
    init(
        items: [PKPaymentSummaryItem],
        currencyCode: String = "USD",
        countryCode: String = "US",
        merchantID: String = "merchant.com.iosapptemplates",
        paymentNetworks: [PKPaymentNetwork] = [PKPaymentNetwork.amex, PKPaymentNetwork.masterCard, PKPaymentNetwork.visa]) {
        self.items = items
        self.currencyCode = currencyCode
        self.countryCode = countryCode
        self.merchantID = merchantID
        self.paymentNetworks = paymentNetworks
    }
    func paymentViewController() -> PKPaymentAuthorizationViewController? {
        if PKPaymentAuthorizationViewController.canMakePayments(usingNetworks: paymentNetworks) {
            let request = PKPaymentRequest()
            request.currencyCode = self.currencyCode
            request.countryCode = self.countryCode
            request.supportedNetworks = paymentNetworks
            request.merchantIdentifier = self.merchantID
            request.paymentSummaryItems = items
            request.merchantCapabilities = .capabilityCredit
            return PKPaymentAuthorizationViewController(paymentRequest: request)
        }
        return nil
    }
}
Looking for a custom mobile application?
Our team of expert mobile developers can help you build a custom mobile app that meets your specific needs.
Get in TouchNice and easy, isn’t it?