UISearchController Tutorial - Building a Search Feature in Swift

Almost any iOS app has a search feature. In fact, all of our functional iOS UI Kits have a search functionality. To this point, we’ve decided to write this Swift tutorial on UISearchController, walking you through building a search feature for your iOS app in Swift. Our app templates have more complex searching logic, since they are hooked to Firebase backend, which is where the searchable data is being retrieved from. For the purpose of this tutorial, we’ve simplified the UISearchController, to simply display a search bar in the navigation bar, by relying on static data, rather than data generated by a server.
1. Introduction to UISearchController
Nowadays, user-generated data is getting larger and larger. Sometimes, if the data is too big, it will take a lot of time and effort to manually find the data that a user is looking for, which is not a good user experience. Therefore, the integration of a search engine is really essential.
Luckily, in Swift, we have UISearchController, a class which is used to integrate search functionalities into mobile applications for iOS. Before iOS 8, you may already be familiar with the UISearchDisplayController class. However, after that, this class has been deprecated and UISearchController class took over. Comparing with the old UISearchDisplayController class, the UISearchController class is much simpler and easier to use.
In this Swift tutorial, we’ll cover how to use UISearchController in order to search for data in our iOS application. So, let’s get started!
Mega Bundle Sale is ON! Get ALL of our React Native codebases at 90% OFF discount 🔥
Get the Mega Bundle2. UISearchController example
a. Download Starter Project on Github
Because the purpose of this article is to learn about UISearchController, I will ignore some concepts and UI issues related to UITableView and autolayout and solely focus on the UISearchController. You can download the starter project here.
What did we have in the starter project? Let’s take a closer look and identify:
-
UITableView inside UIViewController
-
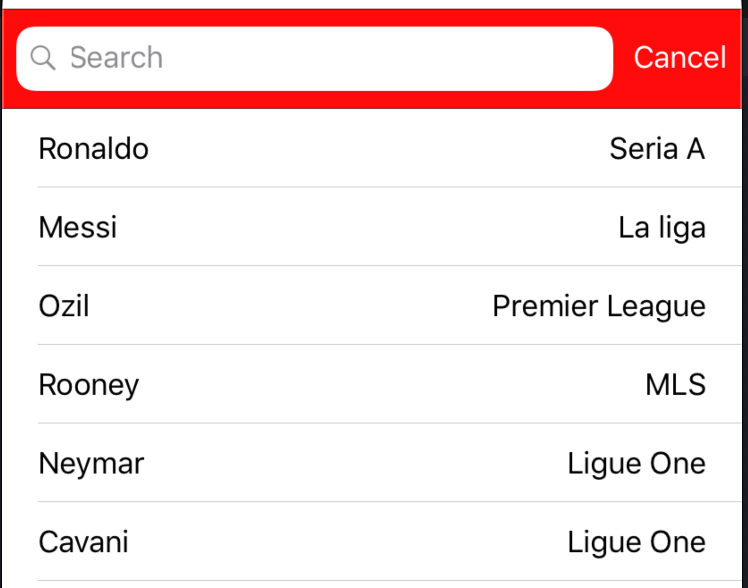
It displays the list of football players, which includes the name and the league which they are playing
Run the app in Xcode, on an iOS simulator or iPhone. It should look like this:

Now, we want to implement a search function, in order to allow users to search for football players by name or league.
b. Implementing UISearchController in UITableView
To add a search functionality to the existing table view, let’s first create a variable called “searchController”.
let searchController = UISearchController(searchResultsController: nil)
Then in viewDidLoad, let’s add the following line of code:
searchController.searchResultsUpdater = self
This is the most important part. We assign self to the searchResultsUpdater protocol of the searchController instance. By doing this, we can determine when the text box in the search bar is changed and handle that event in our view controller.
Let’s configure the searchController a little more, with the following two lines of code:
searchController.dimsBackgroundDuringPresentation = false
definesPresentationContext = true
By setting dimsBackgroundDuringPresentation to false will avoid the tableView getting obscured while searching. And by setting definesPresentationContext to true, we can avoid some layout errors.
Mega Bundle Sale is ON! Get ALL of our React Native codebases at 90% OFF discount 🔥
Get the Mega BundleRun the Xcode project again, once you make the above code changes. It looks good, right? Let’s continue.
tableView.tableHeaderView = searchController.searchBar
searchController.searchBar.tintColor = UIColor.white
searchController.searchBar.barTintColor = UIColor.red
Here, we are doing some user interface customizations.The search bar can be displayed on the screen thanks to this line of code (tableView.tableHeaderView = searchController.searchBar). This is where the magic happens, since this is the line of code that allows us to embed a custom search bar into the navigation bar. And with the last two lines of code, we are changing the colors of the searchBar as we wish.
After reviewing all the Swift code from the start to this point, the view controller should look like this:
class ViewController: UIViewController {
  @IBOutlet weak var tableView: UITableView!
  var cellIdentifier = “cell”
  let searchController = UISearchController(searchResultsController: nil)
  override func viewDidLoad() {
    super.viewDidLoad()
    tableView.dataSource = self
    searchController.searchResultsUpdater = self
    searchController.dimsBackgroundDuringPresentation = false
    definesPresentationContext = true
    tableView.tableHeaderView = searchController.searchBar
    searchController.searchBar.tintColor = UIColor.white
    searchController.searchBar.barTintColor = UIColor.red
  }
}
After assigning self to the searchResultsUpdater protocol, we need to implement this protocol, to avoid compiling errors. Here is what we need to do:
extension ViewController: UISearchResultsUpdating {
   func updateSearchResults(for searchController: UISearchController) {
    // TO-DO: Implement here
  }
}
If you’re not familiar with extensions, check out Apple’s documentation. A Swift extension is a way of adding extra functionality to a class, without modifying its body – an extension decorates a class. In this scenario, we make the View Controller conform to the UISearchResultsUpdating protocol, which implements one method. Pay attention to the updateSearchResults function. It will be called whenever the search bar’s text box changes. Try building and running the application and see how it looks like. You should get something like this:
BAAAMM, it looks good, right? In the next part, we will focus on the searching functionality itself.
Mega Bundle Sale is ON! Get ALL of our React Native codebases at 90% OFF discount 🔥
Get the Mega Bundlec. Implement the searching functionality
First, we need to create a variable called: filteredFootballer. It’ll store the values we get from searching.
var filteredFootballer = [Footballer]()
Next, we will implement the most important function of this article: The Search.
private func filterFootballers(for searchText: String) {
  filteredFootballer = allPlayers.filter { footballer in
    return
      footballer.name.lowercased().contains(searchText.lowercased())
  }
  tableView.reloadData()
}
This function will filter out the players whose names do not match the typed in search text. Pay close attention to this point, we can the filtering logic to whatever we want. For example, to search by name or by the league, we only need to change the property on the footballer (footballer.name or footballer.league).
Now, let’s just call this function inside updateSearchResults:
func updateSearchResults(for searchController: UISearchController) {
  filterFootballers(for: searchController.searchBar.text ?? “”)
}
The last thing we need to do is to configure the tableView again when the searching function is working. Instead of using the arrays of footballers as the table view data source, we need to use the filteredFootballers array. In this way, we display the filtered results, rather than the entire list of objects.
func tableView(_ tableView: UITableView, numberOfRowsInSection section: Int) -> Int {
  if searchController.isActive && searchController.searchBar.text != “” {
    return filteredFootballer.count
  }
  return allPlayers.count
}
func tableView(_ tableView: UITableView, cellForRowAt indexPath: IndexPath) -> UITableViewCell {
  let cell = tableView.dequeueReusableCell(withIdentifier: cellIdentifier, for: indexPath)
  let footballer: Footballer
  if searchController.isActive && searchController.searchBar.text != “” {
    footballer = filteredFootballer[indexPath.row]
  } else {
    footballer = allPlayers[indexPath.row]
  }
  cell.textLabel?.text = footballer.name
  cell.detailTextLabel?.text = footballer.league
  return cell
}
Let’s try running the project again. BAAM, it worked as expected. You’re supposed to see this now: a searchable table view, with dynamic filtering.
-415ec73f242ba1415291264a62e4fe65.png)
Looking for a custom mobile application?
Our team of expert mobile developers can help you build a custom mobile app that meets your specific needs.
Get in TouchConclusion
In this article, we saw how to implement a search functionality in Swift, by using UISearchController, an important UI class for searching user data in iOS. Here is the final open source code. You can download it and continue to explore adding more features, such as searching by the league. Hope you’ve enjoyed this tutorial on building a UISearchController inside a UITableView. For learning how to incorporate a backend into the search feature, check out our awesome iOS Design Kits. Please share our article, to let other people learn about it.