How to Use Camera and Library to Take Photos in SwiftUI - iOS Tutorial

Hello, welcome back to our SwiftUI tutorials series. In this article, we are going to learn how to use the photo camera and library picker in SwiftUI to take photos within our iOS apps – a feature that nearly every mobile application needs nowadays, especially with the latest iPhone release, that has 3 cameras!
Before diving into the tutorial, there's one thing that you need to prepare in order to be able to totally focus on the main content. In Info.plist, be sure that you properly described the purpose of using the camera or photo gallery. That field is named NSPhotoLibraryUsageDescription and it's mandatory for all apps that use the photo camera. If these keys do not give the purpose or the reason is not appropriate, your app will get rejected when you are thinking about submitting it. It'll also crash. See the following example. Now, let's get started.
1. Initialize the Content View
At first, add this block of code into the ContentView's body:
struct ContentView: View {
    @State var image: Image? = nil

    var body: some View {
        ZStack {
            VStack {
                Button(action: {
                  /// TODO 1: Add the action here
                }) {
                    Text("Choose photos")
                }
                image?.resizable()
                  .frame(width: 250, height: 250)
                  .clipShape(Circle())
                  .overlay(Circle().stroke(Color.white, lineWidth: 4))
                  .shadow(radius: 10)
            }
        }
    }
}
Mega Bundle Sale is ON! Get ALL of our React Native codebases at 90% OFF discount 🔥
Get the Mega BundleThe ContentView above contains two important components:
- A button – used to call the photos gallery up or access the camera.
- An image – display the image when the user has made a selection. We just add some visual effects to make the image more beautiful.
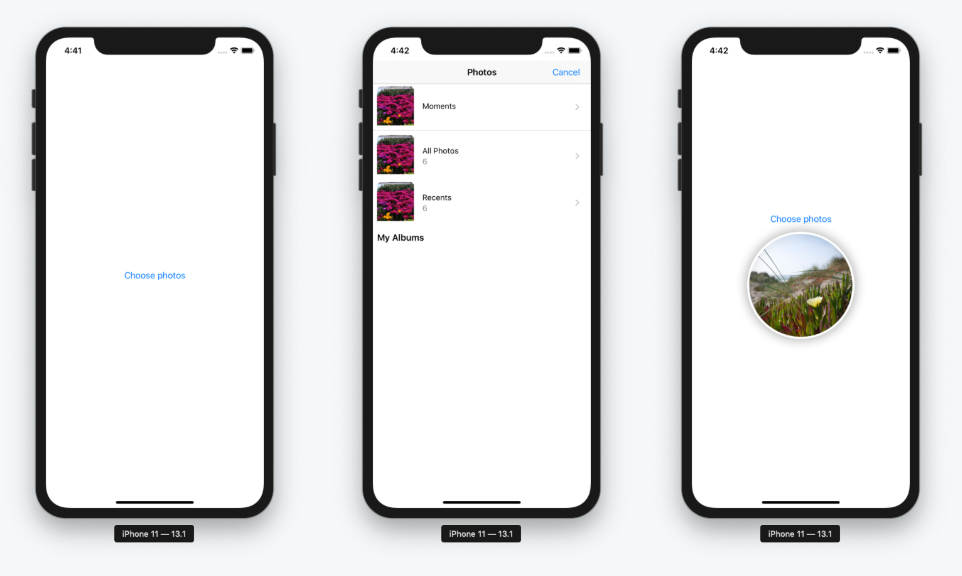
Let's build and run the app. Of course, there is only one button on the screen since we don't have any photo now. To keep the tutorial short, we will not show the result in this step – it's so simple and you can try by yourself.
2. Conform to UIViewControllerRepresentable
For this feature in UIKit, you are probably familiar with UIImagePickerController. Now, the question is how to use UIImagePickerController in SwiftUI? Let's see these lines of code:
struct CaptureImageView {
  /// TODO 2: Implement other things later
}

extension CaptureImageView: UIViewControllerRepresentable {
    func makeUIViewController(context: UIViewControllerRepresentableContext<CaptureImageView>) -> UIImagePickerController {
        let picker = UIImagePickerController()
        picker.delegate = context.coordinator
        return picker
    }

    func updateUIViewController(_ uiViewController: UIImagePickerController,
                                context: UIViewControllerRepresentableContext<CaptureImageView>) {

    }
}
We wrapped our CaptureImageView in a SwiftUI view that conforms to the UIViewControllerRepresentable protocol.
The UIViewControllerRepresentable protocol has two required functions:
- makeUIViewController(context:) It creates your expected view – here is UIImagePickerController
- updateUIViewController(_:context:) It is used to configure the view and responds to any changes.
Mega Bundle Sale is ON! Get ALL of our React Native codebases at 90% OFF discount 🔥
Get the Mega BundleNotes:
- We use the extension with the purpose of showing the code clearly instead of conforming directly.
- This tutorial is using UIViewControllerRepresentable, but if you want to use UIView subclasses, that's also possible. You just need to change UIViewControllerRepresentable into UIViewRepresentable.
3. Photo Picker Coordinator
Let's create a new file named Coordinator and paste this block of code inside.
import SwiftUI

class Coordinator: NSObject, UINavigationControllerDelegate, UIImagePickerControllerDelegate {
  @Binding var isCoordinatorShown: Bool
  @Binding var imageInCoordinator: Image?

  init(isShown: Binding<Bool>, image: Binding<Image?>) {
    _isCoordinatorShown = isShown
    _imageInCoordinator = image
  }

  func imagePickerController(_ picker: UIImagePickerController,
                didFinishPickingMediaWithInfo info: [UIImagePickerController.InfoKey : Any]) {
     guard let unwrapImage = info[UIImagePickerController.InfoKey.originalImage] as? UIImage else { return }
     imageInCoordinator = Image(uiImage: unwrapImage)
     isCoordinatorShown = false
  }

  func imagePickerControllerDidCancel(_ picker: UIImagePickerController) {
     isCoordinatorShown = false
  }
}
The coordinator looks like a bridge between UIView and SwiftUI, it takes responsibility for listening to UIKit actions and send them back to SwiftUI. As you can see, we have two methods here: imagePickerController and imagePickerControllerDidCancel corresponding to the two tasks of making a selection and canceling.
4. Taking Photos with Camera & Library in SwiftUI
Firstly, in CaptureImageView struct, replace /// TODO 1 with the following :
struct CaptureImageView {
    /// MARK: - Properties
    @Binding var isShown: Bool
    @Binding var image: Image?

    func makeCoordinator() -> Coordinator {
      return Coordinator(isShown: $isShown, image: $image)
    }
}
makeCoordinator() method helps us create a new coordinator. We will also declare two parameters:
- isShown – keep track of the status of our view (is it open or closed?)
- Image – an instance is used to save the selected image.
Mega Bundle Sale is ON! Get ALL of our React Native codebases at 90% OFF discount 🔥
Get the Mega BundleNext, in our main ContentView, we are going to do the following:
- Declare an instance named showCaptureImageView (@State var showCaptureImageView: Bool = false) – Whenever this variable is true, we will open our gallery or camera.
- replace /// TODO 1 by this line of code: self.showCaptureImageView.toggle()
- Below the VStack, when showCaptureImageView is true, we will call the CaptureImageView.
Declare an instance named showCaptureImageView (@State var showCaptureImageView: Bool = false) – Whenever this variable is true, we will open our gallery or camera.
The body's ContentView looks like now:
var body: some View {
    ZStack {
        VStack {
            Button(action: {
          self.showCaptureImageView.toggle()
            }) {
                Text("Choose photos")
            }
            image?.resizable()
          .frame(width: 250, height: 200)
          .clipShape(Circle())
          .overlay(Circle().stroke(Color.white, lineWidth: 4))
          .shadow(radius: 10)
        }
      if (showCaptureImageView) {
        CaptureImageView(isShown: $showCaptureImageView, image: $image)
      }
    }
}
Build and run to see how it works.

So we have completed the Image Gallery photo picking section. To take photos with the camera we need to make a small change.
Back to CaptureImageView extension, inside the makeUIViewController method, you just need to add the following code right below picker.delegate:
picker.sourceType = .camera
In practice, we are going to need a variable to keep track of what kind of source users have chosen to display accordingly. If you do not declare that line of code, it will show the photo gallery by default.
Looking for a custom mobile application?
Our team of expert mobile developers can help you build a custom mobile app that meets your specific needs.
Get in TouchConclusion
After today's tutorial, we hope you learn a lot, not only on the main topic, but also UIViewControllerRepresentable, Coordinator and knows how to embed a UIView or UIviewController inside SwiftUI code.
As you can see, support for Camera & Photo Library in SwiftUI is actually relying on the legacy UIKit class (UIImagePickerController). Most likely Apple will introduce "native" SwiftUI support for the camera in the future SwiftUI releases, but until then, UIKit is not going anywhere. It's too bad we'll need to live with these SwiftUI wrappers around UIKit classes for a few years – they add an unfortunate & unnecessary layer of complexity.
Hope you enjoyed the this SwiftUI tutorial. You can download the full source code on GitHub. If you liked this tutorial, don't forget to also give us a star on Github. Happy Coding!