MVVM with Combine in SwiftUI – Tutorial

In this article we are going to learn how to implement the powerful MVVM design pattern in SwiftUI applications that are leveraging the Combine framework. The combination of these 3 concepts will be the standard of iOS app architecture for the years to come, so it’s really important to set up a solid groundwork when it comes to designing Swift apps going forward.
Today, we are discussing Combine and SwiftUI – the two latest frameworks that Apple has introduced recently. At the moment, tutorials simply introduce or analyze each framework individually. In this article, we'll try to put them together to see how they fit together. Also, we will also use the MVVM pattern which is perfectly suitable for these two frameworks. Let's go.
- Why is MVVM The Most Popular Design Pattern in iOS?
If you’ve ever worked with RxSwift and RxCocoa, you’ll see the similarities between them and this new duo. But even with RxCocoa, we still need a place to bind data from ViewModel to View and vice versa – that was ViewController in the old UIKit world. Thus, MVVM has not really reflected its true nature: View – ViewModel – Model even when using RxSwift / RxCocoa. We have a more in-depth analysis of MVVM in our iOS MVVM Design Pattern article.
But with Combine and SwiftUI, MVVM truly shines. Because in SwiftUI, this iOS framework will actually re-render the component that needs to be updated. In other words, the binding steps have been done right on Views (sorry ViewController, but you have no more duties here). Let’s see how it works in practice.
We are going to create a simple application that loads the list of breweries – which you can come to drink after this outbreak of COVID-19 disappears. So we need to create 3 main objects as follows:
- Brewery: The Model
- BreweriesViewModel
- BreweriesView
Mega Bundle Sale is ON! Get ALL of our React Native codebases at 90% OFF discount 🔥
Get the Mega Bundle- Implementing The Model and The View in SwiftUI
The reason why we tackle both these objects in part one is that they are quite simple.
The URL we are going to use is https://api.openbrewerydb.org/breweries. Now let’s see how the JSON payload looks like.
[
  {
    "id": 2,
    "name": "Avondale Brewing Co",
    "brewery_type": "micro",
    "street": "201 41st St S",
    "city": "Birmingham",
    "state": "Alabama",
    "postal_code": "35222-1932",
    "country": "United States",
    "longitude": "-86.774322",
    "latitude": "33.524521",
    "phone": "2057775456",
    "website_url": "http://www.avondalebrewing.com",
    "updated_at": "2018-08-23T23:19:57.825Z"
  },
  {...}
]
So, with a response like this, the Model class will be Brewery, and it simply holds data we need. At this point, we just define three parameters to demo. As a challenge, you can get more parameters to show on your own UI.
struct Brewery {
    let name: String
    let street: String
    let city: String
}
The View layer is next. We will have two views:
- The first view is our main view – BreweriesView. It’s quite simple. It just contains a list inside a navigation view. The data is temporarily an empty array whose content type is Brewery.
- A small note here is to let List be able to iterate on an array of Brewery, we need to make the Brewery model conform to the Hashable protocol.
struct BreweriesView: View {
    let breweries = [Brewery]()
    var body: some View {
        NavigationView {
            List(breweries, id: \.self) {
                BreweryView(brewery: $0)
            }.navigationBarTitle("Breweries")
        }
    }
}
The item view of the list is a custom view – BreweryView. It takes a Brewery as a dependency – and uses this to render the UI. This is the place for you to unleash your creativity.
struct BreweryView: View {
    private let brewery: Brewery
    init(brewery: Brewery) {
        self.brewery = brewery
    }

    var body: some View {
        HStack {
            Image(uiImage: UIImage(named: "beer")!)
                .resizable()
                .scaledToFit()
                .frame(width: 80, height: 80)
            VStack(alignment: .leading, spacing: 15) {
                Text(brewery.name)
                    .font(.system(size: 18))
                    .foregroundColor(Color.blue)
                Text("\(brewery.city) - \(brewery.street)")
                    .font(.system(size: 14))
            }
        }
    }
}
Mega Bundle Sale is ON! Get ALL of our React Native codebases at 90% OFF discount 🔥
Get the Mega Bundle- Implementing The ViewModel with Combine
The main responsibility of this ViewModel is to fetch data from the server. After that, it will decode into our model types and then binding them to the View. Well, a lot of work, now let’s see how we deal with this:
class BreweriesViewModel: ObservableObject {
    private let url = "https://api.openbrewerydb.org/breweries"
    func fetchBreweries() {
       // To-do: implement here
    }
}
From the iOS 13, URLSession supports a built-in publisher, which publishes data when the task completes or terminates if the task fails with an error. That is DataTaskPublisher.

As you can see here, the output will be data and URLRepsponse. So at this point, we just care about the Data. In the real world, you can check the URLResponse to validate more things from the server like statusCode. Now, let’s do it:
func fetchBreweries() {
    URLSession.shared.dataTaskPublisher(for: URL(string: url)!)
        .map { $0.data }
}
After we had the data, we could decode it into an array of Breweries. Remember to make our model conform to Decodable
func fetchBreweries() {
    URLSession.shared.dataTaskPublisher(for: URL(string: url)!)
      .map { $0.data }
      .decode(type: [Brewery].self, decoder: JSONDecoder())
}
But what if the upstream publisher fails with an error? Or what if we have invalid data? In such cases, we will use replaceError. It will replace any errors in the stream with the provided element. In our case, we would like to return an empty array. It’s fine for our tutorial.
func fetchBreweries() {
    URLSession.shared.dataTaskPublisher(for: URL(string: url)!)
      .map { $0.data }
      .decode(type: [Brewery].self, decoder: JSONDecoder())
      .replaceError(with: [])
}
Next, we need to erase the returned type to AnyPublisher then assign it to a property that can publish value to view. Since the data needs to be rendered on UI, we want to receive it on the MainThread. So, the final ViewModel class looks like this:
class BreweriesViewModel: ObservableObject {
    private let url = "https://api.openbrewerydb.org/breweries"
    private var task: AnyCancellable?

    @Published var breweries: [Brewery] = []

    func fetchBreweries() {
        task = URLSession.shared.dataTaskPublisher(for: URL(string: url)!)
            .map { $0.data }
            .decode(type: [Brewery].self, decoder: JSONDecoder())
            .replaceError(with: [])
            .eraseToAnyPublisher()
            .receive(on: RunLoop.main)
            .assign(to: \BreweriesViewModel.breweries, on: self)
    }
}
Mega Bundle Sale is ON! Get ALL of our React Native codebases at 90% OFF discount 🔥
Get the Mega Bundle- MVVM Architecture with Combine in SwiftUI
Now, let’s combine all the pieces together, to fully understand how MVVM architecture can be achieved with Combine in SwiftUI apps. In the BreweriesView, we will call the ViewModel directly and the list which it needs comes from that ViewModel. After setting up everything, we just need to invoke fetchBreweries() on the onAppear callback.
struct BreweriesView: View {
    @ObservedObject var viewModel = BreweriesViewModel()
    var body: some View {
        NavigationView {
            List(viewModel.breweries, id: \.self) {
                BreweryView(brewery: $0)
            }.navigationBarTitle("Breweries")
                .onAppear {
                    self.viewModel.fetchBreweries()
            }
        }
    }
}
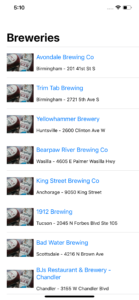
Now, let’s run the iOS app. It should looks like this:
Looking for a custom mobile application?
Our team of expert mobile developers can help you build a custom mobile app that meets your specific needs.
Get in TouchConclusion
Congratulations, we’ve just built an iOS application that has a clean modern MVVM architecture and leverages the hottest Apple’s frameworks – Combine and SwiftUI.
Although simple, the app shows all the concepts related to SwiftUI, Combine, MVVM, and most importantly how they work together. Theoretically, MVVM is best suited for reactive programming frameworks, whereby we clearly divide the responsibilities of the modules (here, in particular, the presentation layer and UI layer). Also, as you can probably predict yourself, SwiftUI and Combine are likely to eliminate the legacy MVC architecture. Big changes are coming and we need to adapt, right?
Here is the full source code on Github. Please give us a star on that repository in case you find it useful. Don’t forget to share this article with your friends. Happy coding!