Stripe Payment Integration with Firebase in Swift
Any business that is developing an e-commerce application will certainly consider Stripe when it comes to processing payments. Stripe provides an awesome library that instantly enables users to use their mobile phones for online payments. Stripe SDK has increased in popularity tremendously in the last 5 years, and it represents our preferred payment processor in our app templates. Integrating Stripe Firebase in iOS is extremely powerful, but quite challenging, which is the reason why we have written this tutorial.
With Stripe, you don’t need to set up a credit gateway or to create a merchant account, while still ensuring security. In this tutorial, we will show you how to integrate Stripe SDK with Firebase, in any iOS app that’s coded in Swift. You can also check out our iOS Stripe starter kit if you’d like to jump straight into the code. Our free iOS starter kit is open-sourced under MIT license, so you can use it in any app you’re building.
We are going to cover a series of critical aspects of mobile payments. What are the components of a payment feature? How do they work together? How is Stripe integrated with Firebase? Accepting payments in a mobile native app has been traditionally challenging, so we hope you are as excited about this tutorial as we are. So let�’s jump right into it.
1. Setting up Stripe
Stripe is a payment support platform with user-friendly APIs, allowing developers to seamlessly integrate payments processing into their web and mobile apps. You can learn more about Stripe on their website. Let’s see what you need to do in order to set up Stripe for your app.
First, create a new Stripe account here and then head over to the Dashboard (these steps are pretty straightforward and can be done within a few seconds). We would like to describe some important keys, which are random strings that you need to add into your app.

Mega Bundle Sale is ON! Get ALL of our React Native codebases at 90% OFF discount 🔥
Get the Mega BundlePublishable key
This is the key that Stripe provides for the front-end backed by Stripe SDK. It is used to create an ephemeral key, which is used for securing credit card management.
Secret key
As the name implies, it is a secret key that you must keep confidential. With this key, you can perform transactions such as payments, delete transaction history, refunds, etc. Keep this key in a secure place, since you don’t want any hackers or attackers to have access to it.
2. Data Flow Overview
This is the data flow of how the app communicates with Stripe & Firebase and to process the transactions

- Step 1: We will get the necessary credit card information & a customer ID and send that info to our Firebase Cloud Functions
- Step 2: In our Firebase server, we will pass this information along to the Stripe API, that will perform the actual transaction.
- Step 3: Stripe will return the result to the Firebase server.
- Step 4: Our Firebase Cloud Function will return the response back to the iOS app.
Wondering about what a customer ID is? Initially, while creating a new account, we also trigger a function which requests the Stripe server to give us a new Stripe account (a.k.a customer object including the ID as a parameter) associated to that new user. The Stripe server will return a customer ID as a result, which we can use to process all subsequent payments for that user. Check out the APIs related to this part for more details.
So the question is why don’t we do all this stuff right in our iOS app? While that will make it easier to accept payments in iOS apps, handling the actual payment in Firebase keeps our code private and more secure. You don’t want to expose the payment processing bit in the app’s binary on the App Store since everyone can access the app. Another benefit of processing payments server-side is that we can use the same code for all client platforms, such as Android or Web.
3. Setting Up the Firebase Server
In this section, we will list out what you need to do on the Firebase server-side, with cloud functions. Check it out this example provided by the official Stripe documentation. We won’t go into more details since it’s out of scope for this Swift tutorial, but we will still guide you through the important points.
Check out the index.js file. Pay attention to the following block of code. As we mentioned above, we are going to create a Firebase Cloud Function that is triggered when a new user is created upon registration:
// When a user is created, register them with Stripe
exports.createStripeCustomer = functions.auth.user().onCreate((user) => {
  return stripe.customers.create({
    email: user.email,
  }).then((customer) => {
    return admin.database().ref(`/stripe_customers/${user.uid}/customer_id`).set(customer.id);
  });
});
So, the process is done as follows:
- Firebase Auth Cloud Function will be triggered right after a new account is created successfully.
- The function will connect to Stripe to create a new Stripe customer.
- The customer ID (or even object) returned from Stripe will be recorded to Cloud Firestore in the same place containing that user’s Firebase uid. It looks like this:

Similarly, we will have other functions such as adding a Payment source (addPaymentSource) or making payments (makePayment). You can find out more right on that example page. Let’s now see how the app gets to access all this infrastructure that’s already been built for us by Firebase and Stripe teams.
4. Accepting Credit Card Payments with Stripe in iOS App
The first thing you need to do is to import Stripe SDK into your Swift App. Use CocoaPods (pod “Stripe”) or Carthage to install it. Nothing new at all.
Next, we’re going to be tackling the most exciting part. How to integrate Stripe in your iOS app using Firebase?
Mega Bundle Sale is ON! Get ALL of our React Native codebases at 90% OFF discount 🔥
Get the Mega Bundle4.1 Import Stripe SDK into App Delegate
In the AppDelegate file, you just need to import Stripe and assign your publishableKey which we introduced in the previous part to STPPaymentConfiguration. And don’t worry, this key is non-sensitive at all, so you can add it in plain text.
import UIKit
import Stripe
@UIApplicationMain
class AppDelegate: UIResponder, UIApplicationDelegate {
    func application(_ application: UIApplication, didFinishLaunchingWithOptions launchOptions: [UIApplicationLaunchOptionsKey: Any]?) -> Bool {
        STPPaymentConfiguration.shared().publishableKey = "pk_test_fWfBU7OCMw7PVSEEDcn7DEBt00nKvVOYia"
        // do any other necessary launch configuration
        return true
    }
}
4.2 Set up an ephemeral key
So what is the ephemeral key? In Stripe’s official documentation, this key is a short-lived API key with restricted API access that’s used to retrieve and update a specific Customer object for the duration of the session.
Let’s check out this function. You should create a class called MyAPIClient and make it conform to STPEphemeralKeyProvider protocol. Then add this Swift method to that class:
func createCustomerKey(withAPIVersion apiVersion: String, completion: @escaping STPJSONResponseCompletionBlock) {
    let url = self.baseURL.appendingPathComponent("ephemeral_keys")
    Alamofire.request(url, method: .post, parameters: [
        "api_version": apiVersion,"customer_id": yourObject.id
        ])
        .validate(statusCode: 200..<300)
        .responseJSON { responseJSON in
            switch responseJSON.result {
            case .success(let json):
                completion(json as? [String: AnyObject], nil)
            case .failure(let error):
                completion(nil, error)
            }
    }
}
As you can see, there are two important parameters in that request. They are “api_version” and “customer_Id“. The reason why we need two parameters is that they are required by the Stripe API. Let’s dive deeper in back-end code:
# Sinatra
post path do
  stripe_version = params['api_version']
  customer_id = session['customer_id']
  key = Stripe::EphemeralKey.create(
    {customer: customer_id},
    {stripe_version: stripe_version}
  )
  key.to_json
end
This line of code: Stripe::EphemeralKey.create( {customer: customer_id}, {stripe_version: stripe_version} ) explains clearly everything. Stripe server will use two parameters to create a new Stripe account for your brand new user.
With our Firebase Cloud Functions, we’ll use a method called Callable. This lets you call functions directly from a Firebase app. It looks like this.
4.3 Set up a customer context, payment context, and its delegate
At this point, we will need a view controller whose purpose is to help users fill in the necessary information, then proceed with payments (for example, CheckOutViewController). We will need to pay attention to two objects:
a. A customer context
Per the documentation: “An STPCustomerContext retrieves and updates a Stripe customer using an ephemeral key, a short-lived API key scoped to a specific customer object“.
let customerContext = STPCustomerContext(keyProvider: MyAPIClient())
Mega Bundle Sale is ON! Get ALL of our React Native codebases at 90% OFF discount 🔥
Get the Mega Bundleb. Payment Context:
This parameter is used to keep track of all of the possible states around a payment.
self.paymentContext = STPPaymentContext(customerContext: customerContext)
self.paymentContext.paymentAmount = 5000
self.paymentContext.delegate = self
self.paymentContext.hostViewController = self
After the customer context is set up successfully, you can use it to initialize STPPaymentContext. You can also set the amount to be paid from here. The amount is usually the total amount of the order.
The next two lines of code are more important
- Assign your payment context’s delegate to self and your class need to conform STPPaymentContextDelegate
- Assign delegate of payment context’s hostViewController to self. After setting this to self, we are going to conform to this delegate as follows:
extension SetPaymentController: STPPaymentContextDelegate {
  func paymentContext(_ paymentContext: STPPaymentContext, didFailToLoadWithError error: Error) {

  }

  func paymentContextDidChange(_ paymentContext: STPPaymentContext) {

  }

  func paymentContext(_ paymentContext: STPPaymentContext, didCreatePaymentResult paymentResult: STPPaymentResult, completion: @escaping STPErrorBlock) {

  }

  func paymentContext(_ paymentContext: STPPaymentContext, didFinishWith status: STPPaymentStatus, error: Error?) {

  }
}
Just leave these functions empty for now. We’re going to be working on these in the next part. We’ve initialized our customer context and payment context but we’re not calling anything with those. So let us show you how easy it is to implement this with standard Stripe UI.
In your CheckOutViewController, you should have three buttons whose actions are “Select Payment”, “Select Shipping” and “PAY”. Let’s assume we have three corresponding IBActions like this:
@IBAction func didSelectPaymentOption(_ sender: Any) {
}
@IBAction func didSelectShippingOption(_ sender: Any) {

}
@IBAction func didTapOnPayment(_ sender: Any) {
}
Inside didSelectPaymentOption function, you only need to call self.paymentContext.pushPaymentOptionsViewController() like this:
@IBAction func didSelectPaymentOption(_ sender: Any) {
  self.paymentContext.pushPaymentOptionsViewController()
}
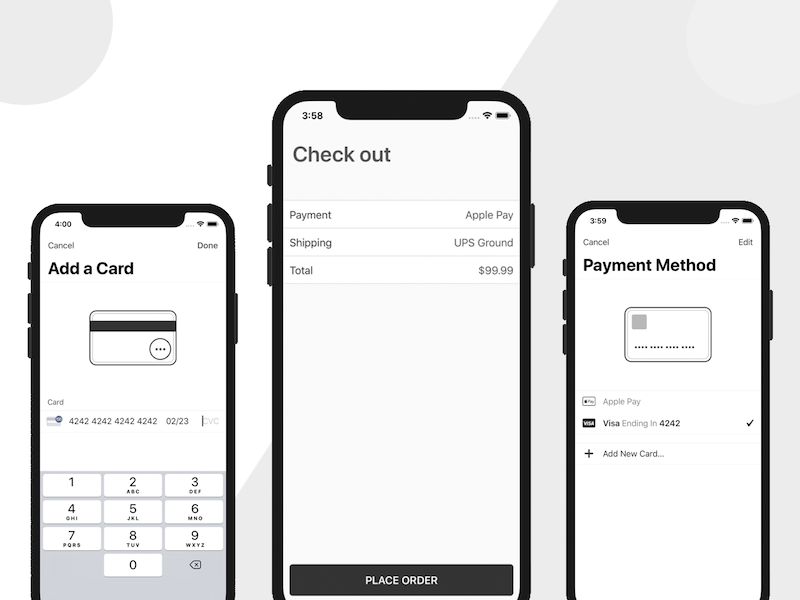
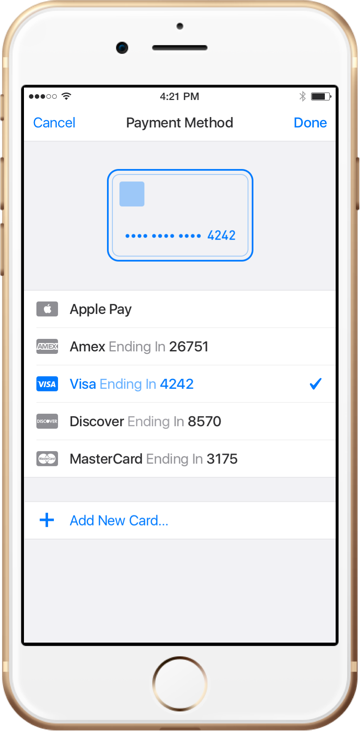
- When running your app and tapping on this button, this screen will be shown
- Tap on Add New Card button, this screen will be shown:
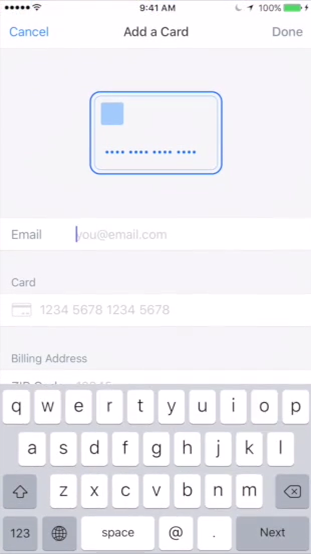
Booom, it’s pretty cool, right? With just a little bit of code, we were able to create the whole process of filling in cred cards and shipping addresses. For didSelectShippingOption and didTapOnPaymen functions, the implementation is similar to the above code snippets:
@IBAction func didSelectShippingOption(_ sender: Any) {
  paymentContext.presentShippingViewController()
}
@IBAction func didTapOnPayment(_ sender: Any) {
  paymentContext.requestPayment()
}
Just a side note, as you can see, the way we display the next screen in the two following methods is different (pushPaymentOptionsViewController and presentShippingViewController). You can use either push or present for both ViewControllers. The transition between screen is different (along with the animations).
Mega Bundle Sale is ON! Get ALL of our React Native codebases at 90% OFF discount 🔥
Get the Mega Bundle5. Payment Actions
5.1. paymentContextDidChange and didUpdateShippingAddress:
didUpdateShippingAddress is called after entering a shipping address. This is the place where you could validate the returned address and let users know which of the shipping methods will be available for that address via the completion handler function. You could also set the shipping fee and display some description text here. Check out the example Swift code:
func paymentContext(_ paymentContext: STPPaymentContext, didUpdateShippingAddress address: STPAddress, completion: @escaping STPShippingMethodsCompletionBlock) {
    let upsGround = PKShippingMethod()
    upsGround.amount = 0
    upsGround.label = "UPS Ground"
    upsGround.detail = "Arrives in 3-5 days"
    upsGround.identifier = "ups_ground"
    let fedEx = PKShippingMethod()
    fedEx.amount = 5.99
    fedEx.label = "FedEx"
    fedEx.detail = "Arrives tomorrow"
    fedEx.identifier = "fedex"
    if address.country == "US" {
        completion(.valid, nil, [upsGround, fedEx], upsGround)
    }
    else {
        completion(.invalid, nil, nil, nil)
    }
}
paymentContextDidChange function is mainly used for updating your CheckoutViewController after the payment method and shipping address were selected. You can call them via the two properties of STPPaymentContext: selectedPaymentOption and selectedPaymentOption
5.2 didCreatePaymentResult
This is the place where we will pass the contents of the paymentResult object to the backend, which should then complete charging your user using the Charge object.
Due to network errors, users will accidentally charge multiple times (this doesn’t happen very often). And no one wants that to happen, for obvious reasons. Stripe API works around this issue by getting in a parameter called idempotency_key (refer to its documentation for more details). This is just a random string which you need to pass with your payment request, in order to avoid double-spending (you can use UUID to generate it).
let data: [String: Any] = ["total": yourTotal, "customerId": stripeId, "idempotency": Helper.randomString() ]
Functions.functions.httpsCallable("<span>createStripeCharge</span>").call(data) { (result, error) in
  guard let error == nil else {
    // handle your logic code when getting errors
    return
  }
- yourTotal is the total amount to be charged
- stripeId is a property belonging to User object in the Firebase document.
- Helper.randomString() is your own function which helps create a random, unique string. That’s all you need to do in your iOS App. Now, modify the Cloud Function:
exports.createStripeCharge = functions.https.onCall(async (data, context) => {

            const amount = data.total;
            const idempotencyKey = data.idempotencyKey;
            const customerId = data.customerId;

            return stripe.charges.create({
              amount: amount,
              currency: 'usd',
              customer: customerId
          }, {
          idempotency_key: idempotencyKey
        }).then( _ => {
            return
        }).catch( err => {
          // handle error here
        });
})
As you can see, we used all the information from the iOS app to process payments via the cloud function. There are even more parameters and features that you can leverage, provided directly by Stripe. Search through the documentation yourself in order to discover them.
5.3 didFinishWithStatus
Let’s look at the code below:
func paymentContext(_ paymentContext: STPPaymentContext,
  didFinishWithStatus status: STPPaymentStatus,
  error: Error?) {
    switch status {
    case .error:
        self.showError(error)
    case .success:
        self.showReceipt()
    case .userCancellation:
        return // Do nothing
    }
}
This is where we update the UI corresponding to the returned results based on the “status” variable.
5.4 didFailToLoadWithError
This function is called when the payment context’s initial loading call fails. This rarely happens, but it is still possible (when the network is slow or flaky). So, in this function, you can reload UI or show an error message (or use retryLoading on the payment context).
func paymentContext(_ paymentContext: STPPaymentContext,
  didFailToLoadWithError error: Error) {
    self.navigationController?.popViewController(animated: true)
    // Show the error to your user, etc.
}
Looking for a custom mobile application?
Our team of expert mobile developers can help you build a custom mobile app that meets your specific needs.
Get in TouchConclusion on Stripe Firebase payments
We know this was a super long tutorial but this is the best way that we can help you visualize how to integrate the Stripe into our iOS app with Firebase Cloud Functions. You can also use your own server instead of Firebase and in this article, we’ve talked about that. It only differs slightly in syntax, the main logic is the same.
We have already built a free app template to support payments with Stripe, so please give us a star on Github in case you find it useful. Don’t forget to share this article with your friends. Happy coding!