SnapKit Tutorial: Simplifying Auto Layout in iOS App Development
For iOS developers, setting up UI programmatically might feel hard and complicated, especially if you are not very experienced in Swift. But luckily, there are a lot of libraries supporting us with this problem. One of them is SnapKit. In our mobile app templates, we use SnapKit to set up UI programmatically, since it’s by far the best Swift UI Layout Library. In this SnapKit tutorial, we are going to give you a brief introduction to the SnapKit world.
In this SnapKit tutorial, we are describing our experience of working with SnapKit to help you learn how to simplify auto layout in iOS App Development.

1. Introduction to SnapKit
For iOS programmers, the “Auto-layout” term is extremely familiar. It almost becomes a required part when implementing layout for mobile applications. Currently, there are two streams of ideas at play. One must decide whether to use Interface Builder for implementing layout or do it programmatically. When using Interface Builder, we can add all constraints by using storyboards or xib files, and in that case, our code will be less complicated, since fewer lines of code would be used and the time to write all this code would be discounted. It would be just “drag-drop” stuff.
However, the bigger and more complex your project gets and the higher the number of interface files you have, the more difficult it is to manage these files. And then, if you need some dynamic layouts, you have to drag many constraints to update the UI correspondingly. It makes your project hard to debug and hard to control. And like this is not enough, imagine now that you have a ton of iOS developers working on the same project, so a lot of other problems arise with that, such as merge conflict on autogenerated files. Ugly, right?
So, either way, you have to know how to do auto layout programmatically, since if your app becomes successful, this will be a requirement down the road.
But the biggest disadvantage of using Auto Layout programmatically is that it takes too long. You’ll have to write a ton of code to set constraints instead of a few mouse clicks. Apple’s Auto Layout is extremely verbose and time-consuming to write. SnapKit helps us address this problem, by providing a concise abstraction of Apple’s Auto Layout Constraints system.
Mega Bundle Sale is ON! Get ALL of our React Native codebases at 90% OFF discount 🔥
Get the Mega Bundle2. SnapKit and Usage
SnapKit is a tool allowing iOS developers to manipulate auto-layout constraints easily. By using SnapKit, you can create, update, remove and manage layout constraints of the UI views.
Let’s consider some examples, to give you an idea of how concise and clear SnapKit is, as opposed to Apple’s Cocoa Auto-Layout library. First of all, you need to install SnapKit via CocoaPods (a dependency manager). Add this to your Podfile:
pod 'SnapKit'
And to save time and ink (lol), we won’t talk CocoaPods and the Podfile. They belong to another article, so feel free to Google it.
Do you remember how to add constraints programmatically? For example, if we want to vertically center a view, the code will be something like this:
let horizontalConstraint = NSLayoutConstraint(
    item: view,
    attribute: NSLayoutConstraint.Attribute.centerX,
    relatedBy: NSLayoutConstraint.Relation.equal,
    toItem: view,
    attribute: NSLayoutConstraint.Attribute.centerX,
    multiplier: 1,
    constant: 0
)
Oops, that looks ugly. We don’t even want to think about it, let alone write them down. Let’s see how SnapKit solves this huge pain point for Swift developers.
Let’s display a UIView pinned to the four edges of its superview. So, just imagine we have four constraints such as the one above, with a lot of messy code. Let’s see how SnapKit handles this scenario.
Step 1: Create a UIView programmatically
Imagine we have a blank view controller in a new Xcode project. In viewDidLoad(), we have some of the following lines of code:
let childView = UIView()
childView.backgroundColor = .red
self.view.addSubview(childView)
It is basically creating a new view, setting the background color for it and adding it into the view. That’s all there is to it.
Mega Bundle Sale is ON! Get ALL of our React Native codebases at 90% OFF discount 🔥
Get the Mega BundleStep 2: Use SnapKit
First of all, we need to import this library.
import SnapKit
And let’s continue to write codes inside viewDidLoad()
childView.snp.makeConstraints { (make) in
  make.top.bottom.left.right.equalTo(self.view)
}
Now, let’s build and run the Xcode sample project:
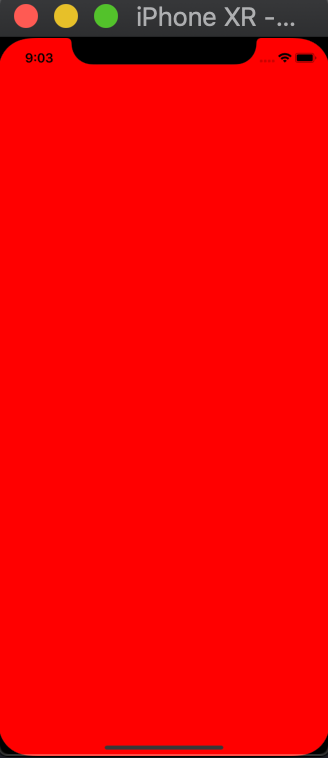
It’s really simple, right?! Literally, with one line, we have made all four edges of the childView equal to the edges of the super.view. If you compare this with the code we showed in the previous section, this is a much more concise approach. So you are already saving a ton of time while coding UI. But that’s not all. We can even refactor this code on step further:
childView.snp.makeConstraints { (make) in
  make.edges.equalTo(self.view)
}
Now re-run and you can see we pinned four edges using just one single line of code, instead of twenty or thirty lines like we showed before.
3. More SnapKit Examples
Let’s continue with another SnapKit example. We will create another view, called anotherChildView:
let anotherChildView = UIView()
anotherChildView.backgroundColor = .yellow
self.view.addSubview(anotherChildView)
Let’s try new things in SnapKit:
childView.snp.makeConstraints { (make) in
  make.size.equalTo(CGSize(width: 300, height: 300))
  make.top.equalTo(self.view.snp.top).offset(100)
  make.centerX.equalTo(self.view)
}
anotherChildView.snp.makeConstraints { (make) in
  make.size.equalTo(childView)
  make.top.equalTo(childView.snp.bottom).offset(50)
  make.centerX.equalTo(self.view)
}
As you can see, we have a lot of functions
- size.equalTo
- top.equalTo (Likewise, we have bottom.equalTo, left.equalTo and right.equalTo) with the offset.
- **centerX.**equalTo and centerY.equalTo with the offset.
Besides these, SnapKit also has .multipliedBy. You can use this function to create the aspect ratio for the views. Because these lines of code are quite easy and straightforward, we will not dig into the implementation details. You could refer to SnapKit.io website as its documentation is really detailed and easy to follow.
Now let’s run this once more.
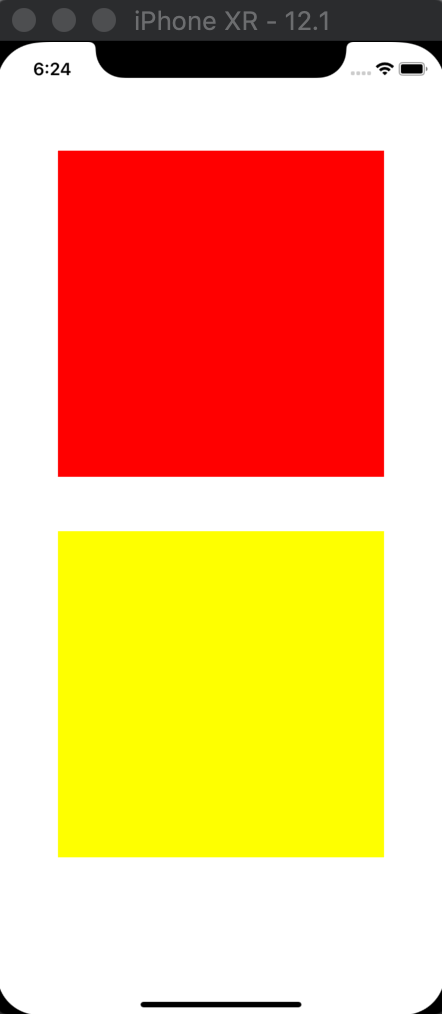
It worked as expected. In addition, SnapKit also supports us with debugging. It will show us exactly the views for which the constraints are broken. We can then easily check and update those constraints correspondingly.
Looking for a custom mobile application?
Our team of expert mobile developers can help you build a custom mobile app that meets your specific needs.
Get in TouchConclusion on SnapKit
After reading this SnapKit Tutorial, we hope you can see the benefits of SnapKit for setting up UI programmatically. It allows you to write less code, which in turn makes the whole process much simpler. As a small downside, however, we still need to continue to learn how to use Auto-layout programmatically with the available iOS APIs (because SnapKit is just a third-party library, which someday may not be supported anymore – this is highly unlikely since there’s a huge iOS Community around the SnapKit open-source project).
Overall, SnapKit is a useful library if you want to improve your code when making constraints programmatically. Your Xcode project will get more concise and more modularized, which is exactly the reason why we are heavily using SnapKit in our iOS Starter Kits. Here is the source code for this SnapKit Tutorial. Happy Coding!