Push Notifications with Firebase in Swift 5 - Tutorial
Every iOS app should leverage push notifications to boost user engagement and retention. Push notifications are a powerful tool, but implementing them in Swift 5 has been historically tricky since you usually needed a server. If you’re just getting started with your app development, chances are you’re already using Firebase as your backend. That’s great news – implementing push notifications with Firebase in Swift 5 is what we cover in this tutorial. In fact, we’ve followed exactly these steps to add push notifications to our Group Chat app.
The other day, I was working on a dating app template, where I also needed device-to-device push notifications (for a chat feature). As part of that, I wasted several hours debugging multiple issues, while integrating push notifications with Firebase in Swift 5. So I decided to write down all the learnings as well as open-source the implementation so that I’ll save everyone landing on this page a lot of trouble.
After completing this tutorial, you’ll be able to:
- Have your users register for push notifications
- Send notifications from Firebase Dashboard to any user
- Send device-to-device push notifications
Mega Bundle Sale is ON! Get ALL of our React Native codebases at 90% OFF discount 🔥
Get the Mega BundleOn a high-level, here are the steps to integrate Firebase push notifications in Swift 5:
- Generate an APNs certificate on Apple’s Developer portal
- Enable Push Notification in Firebase Cloud Messaging Console
- Add the Firebase Cocoa dependencies to your Pod file
- Write the code to generate the push notification token
- Send a push notification from Firebase Notifications dashboard
For device-to-device push notifications you’ll also need to:
- Write the code to save the push token into Firestore
- Write the class that sends a push notification to a given push token
Feel free to jump to the end or download the free Swift starter kit directly, if you feel confident with your set up already. Let’s get started.
1. Generate an APNs certificate
- Head over to Apple, click “Account” and log into your developer account.
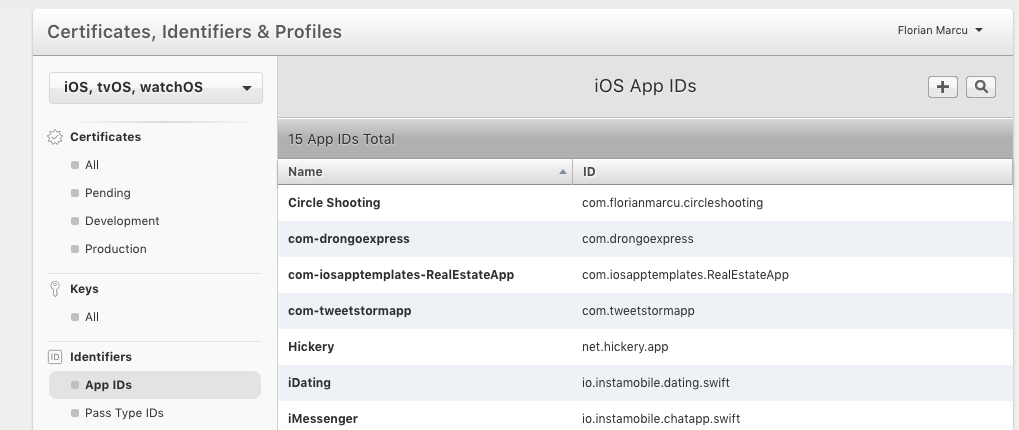
- In the left menu, select “Certificates, IDs & Profiles“
- In the Identifiers section menu, select “App IDs” and click the “Add New App ID” button
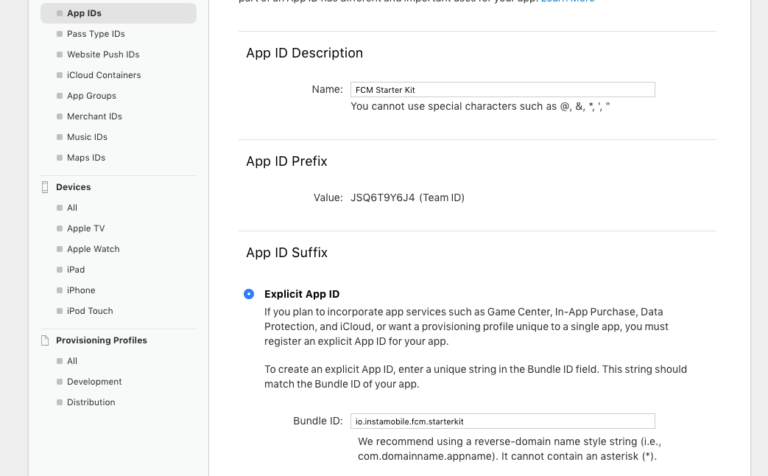
- Fill out App ID Description & Bundle ID fields. Check “Push Notifications” and click “Continue“. The on the next screen click “Register”
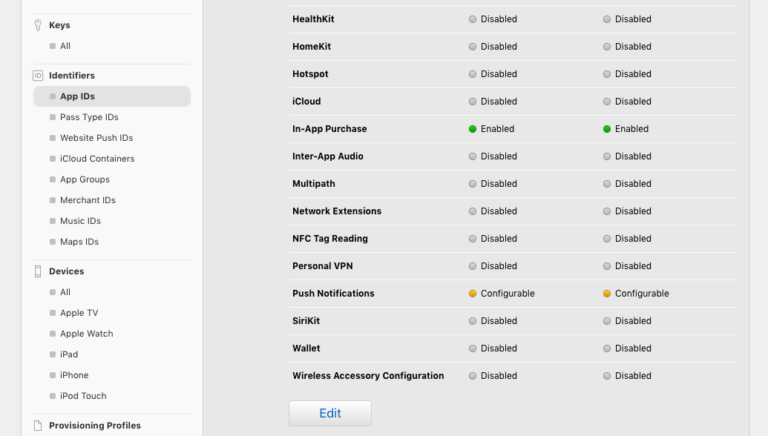
- In the new “App IDs” list, select the newly created App ID and click “Edit“
-
Scroll down to the “Push Notifications” section and click on “Create Certificate” (you’re good with Development SSL Certificate for now) – you’ll create the other one only when you submit your app to the App Store
-
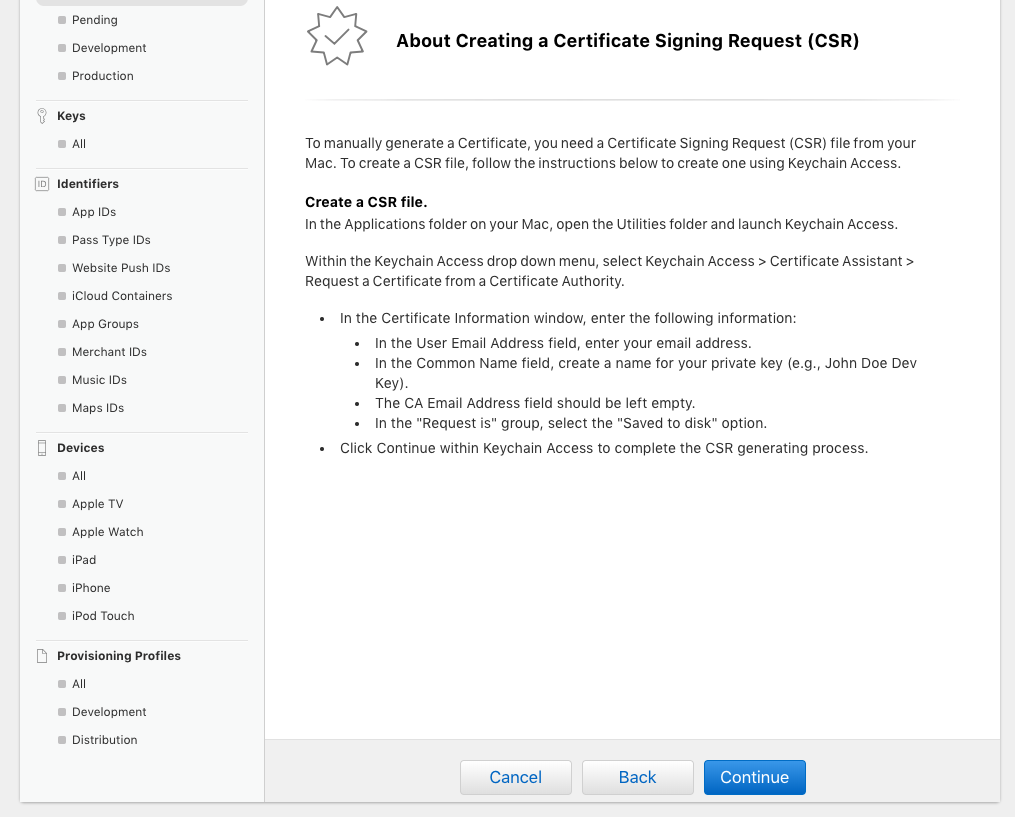
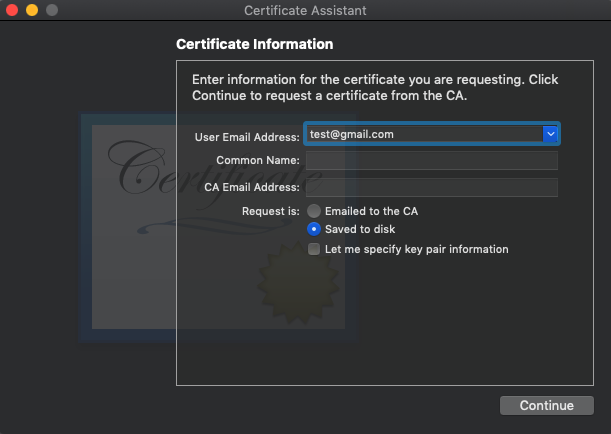
Follow the instructions for creating a CSR certificate from a Certificate Authority, using Keychain Access app on your laptop. And then click “Continue”
-
In the next screen on Apple’s website, upload the certificate you’ve just saved to disk. If you’re getting an “Invalid Certificate” error try removing all the expired certificates in your Keychain and re-create the CSR from the previous step. Now you should have a certificate created – download and store it securely on your laptop (the file extension is .cer).
-
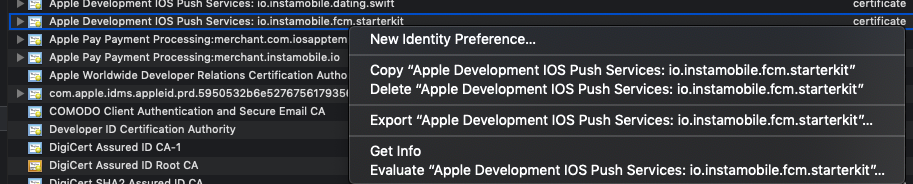
Then, open the .cer file (by double-clicking on it) and add it to your Keychain. Once in Keychain, right-click on the certificate and then choose “Export“. This will create a .p12 file for you (you can choose an encryption password as well for extra security)
Mega Bundle Sale is ON! Get ALL of our React Native codebases at 90% OFF discount 🔥
Get the Mega Bundle2. Enable Push Notification in Firebase Cloud Messaging Console
-
Head over to Firebase Console. If you don’t have a project, create one. Then choose a project and head over to its console.
-
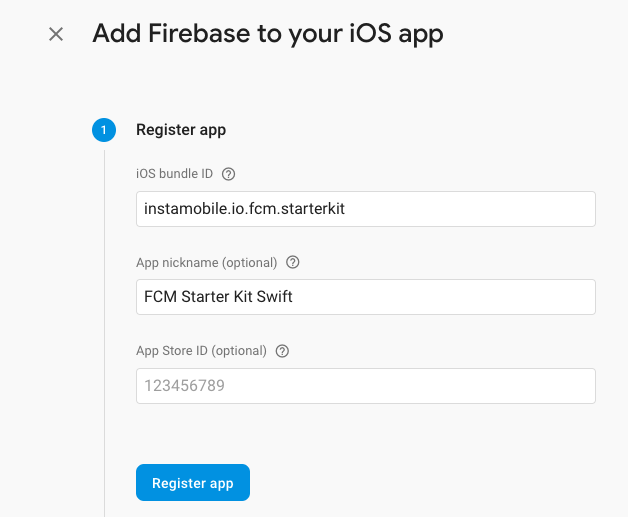
If you don’t have an iOS app already, create one by clicking “Add App”. on Firebase Console homepage. Make sure you use exactly the same bundle ID as the one you used in Apple Developer portal. Then download the GoogleService.plist file, which you’ll need to add to your Xcode project.
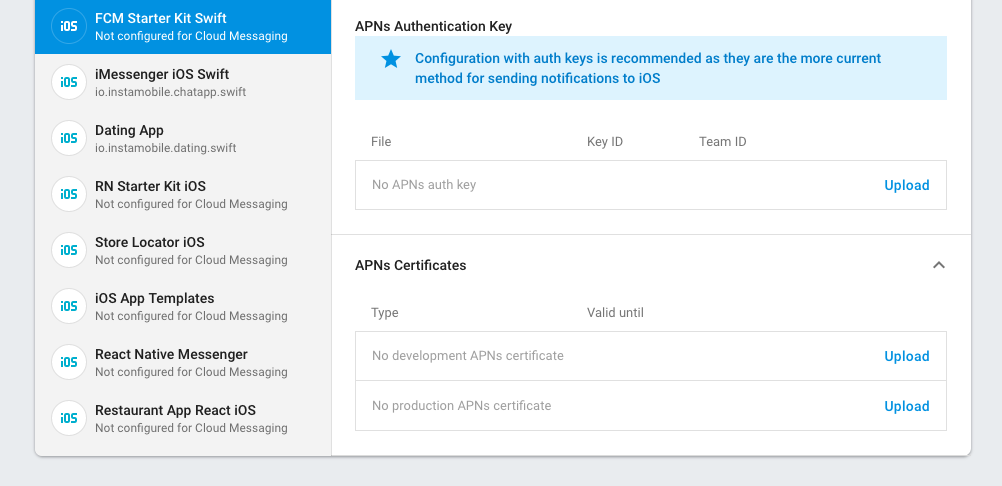
- In Firebase, locate your app and go to Project Settings -> Cloud Messaging tab

- Locate the “APNs Certificates” section and upload the .p12 file you’ve generated previously. If you used a password, you also need to type it in the password field.
- Now you’ll be able to send push notifications with Firebase in Swift 5.
3. Add the Firebase Cocoa dependencies to your Pod file
-
Create a new empty Xcode project (File -> New Project -> Single View App -> Next -> Create) or clone our Starter Kit to make it easier
-
In your projects root directory, run “pod init” or create a Podfile manually.
-
Open Podfile (for instance, in Sublime) and add the following Firebase Pod dependencies
platform :ios, '11.0'
target 'FirebaseStarterKit' do
  # Comment the next line if you're not using Swift and don't want to use dynamic frameworks
  use_frameworks!
  # Pods for FirebaseStarterKit
  pod 'Firebase/Core'
  pod 'Firebase/Auth'
  pod 'Firebase/AdMob'
  pod 'Firebase/Database'
  pod 'Firebase/Messaging'
  pod 'Firebase/Storage'
  pod 'Firebase/Firestore'
end
- Run “pod update” to install the cocoa pods
- Open the .xcworkspace file in Xcode
3.1 Enable “Push Notifications” capabilities in Xcode, by selecting the build target and then Capabilities tab

3.2 Add GoogleService.plist file to your Xcode project
This is the file you’ve downloaded earlier from Firebase Console. In order to connect the iOS app to the Firebase server, you’ll have to add this to the Xcode project. Otherwise, you’ll get a crash.
4. Write the code to generate the push notification token
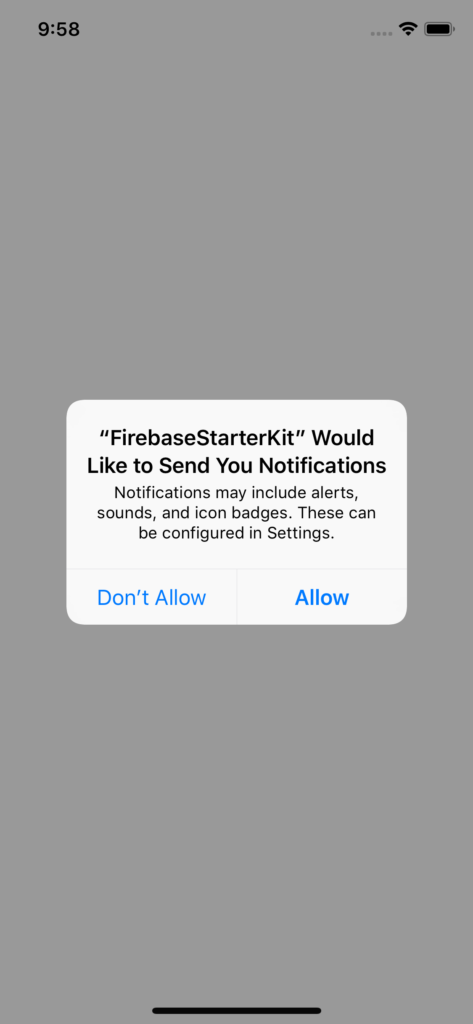
For that, we are providing a helper class to encapsulate the whole logic. PushNotificationManager will handle the registration of the push token for the current device. It’ll also trigger a system dialog asking users to accept push notification permissions. Make sure you say “Yes” to that, otherwise notifications won’t send. The object takes in a userID string and maps that userID with the generated push token into users_table in Firestore – this is needed for device-to-device remote push notifications.
import Firebase
import FirebaseFirestore
import FirebaseMessaging
import UIKit
import UserNotifications
class PushNotificationManager: NSObject, MessagingDelegate, UNUserNotificationCenterDelegate {
    let userID: String
    init(userID: String) {
        self.userID = userID
        super.init()
    }
    func registerForPushNotifications() {
        if #available(iOS 10.0, *) {
            // For iOS 10 display notification (sent via APNS)
            UNUserNotificationCenter.current().delegate = self
            let authOptions: UNAuthorizationOptions = [.alert, .badge, .sound]
            UNUserNotificationCenter.current().requestAuthorization(
                options: authOptions,
                completionHandler: {_, _ in })
            // For iOS 10 data message (sent via FCM)
            Messaging.messaging().delegate = self
        } else {
            let settings: UIUserNotificationSettings =
                UIUserNotificationSettings(types: [.alert, .badge, .sound], categories: nil)
            UIApplication.shared.registerUserNotificationSettings(settings)
        }
        UIApplication.shared.registerForRemoteNotifications()
        updateFirestorePushTokenIfNeeded()
    }
    func updateFirestorePushTokenIfNeeded() {
        if let token = Messaging.messaging().fcmToken {
            let usersRef = Firestore.firestore().collection("users_table").document(userID)
            usersRef.setData(["fcmToken": token], merge: true)
        }
    }
    func messaging(_ messaging: Messaging, didReceive remoteMessage: MessagingRemoteMessage) {
        print(remoteMessage.appData)
    }
    func messaging(_ messaging: Messaging, didReceiveRegistrationToken fcmToken: String) {
        updateFirestorePushTokenIfNeeded()
    }
    func userNotificationCenter(_ center: UNUserNotificationCenter, didReceive response: UNNotificationResponse, withCompletionHandler completionHandler: @escaping () -> Void) {
        print(response)
    }
}
Now open the AppDelegate.swift class and two lines of code:
import Firebase
func application(_ application: UIApplication, didFinishLaunchingWithOptions launchOptions: [UIApplication.LaunchOptionsKey: Any]?) -> Bool {
    let pushManager = PushNotificationManager(userID: "currently_logged_in_user_id")
    pushManager.registerForPushNotifications()

    FirebaseApp.configure()
    return true
}
Now run your app and you should see the system dialog popping up. Accept it and move on to the next step.
Mega Bundle Sale is ON! Get ALL of our React Native codebases at 90% OFF discount 🔥
Get the Mega Bundle5. Send a push notification from Firebase Notifications dashboard
-
Head over to Firebase Console again. In the left menu, under Grow click on Cloud Messaging. -> New Notification
-
Fill out the required details (notification title and body), choose the correct bundle identifier, and Send
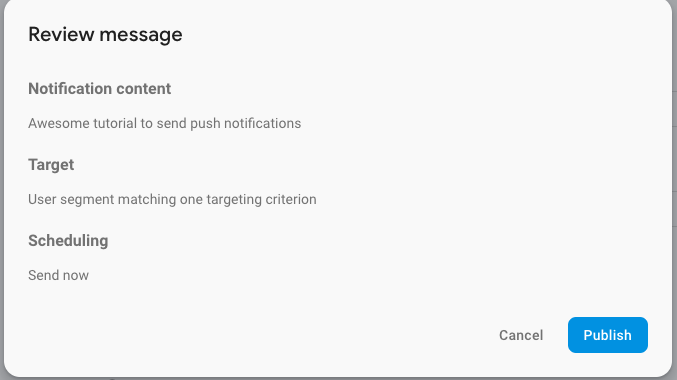
- You should receive the push notification on your device. Please note that this doesn’t work on simulators. You’ll need a real iOS device.
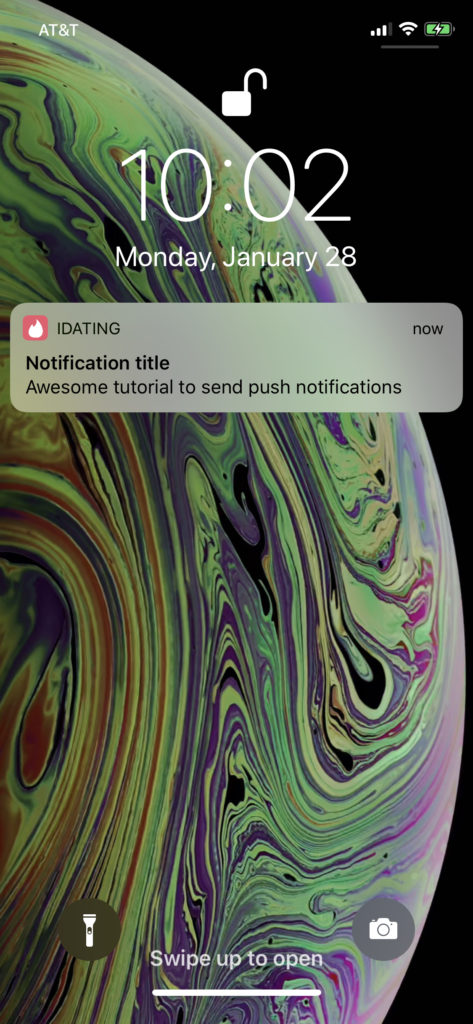
And that’s it – you’ve just sent the first notification with Firebase in Swift 5. Take a moment to celebrate. As we mentioned at the beginning of this tutorial, we are going to show our readers how they can send device-to-device push notifications, through Firebase Cloud Messaging. This comes in handy for chatting apps, dating apps, multiplayer iOS games, etc.
6. Write the code to save the push token into Firestore
Good news – you’ve already done that at step 4. Just as a reminder, here’s the code in PushNotificationManager that saves the user ID – push token mapping to Firestore:
func updateFirestorePushTokenIfNeeded() {
        if let token = Messaging.messaging().fcmToken {
            let usersRef = Firestore.firestore().collection("users_table").document(userID)
            usersRef.setData(["fcmToken": token], merge: true)
        }
    }
7. Write the class that sends a push notification to a given push token
More great news – I’ve already written a class that does that and I’m sharing it here. Meet PushNotificationSender:
import UIKit
class PushNotificationSender {
    func sendPushNotification(to token: String, title: String, body: String) {
        let urlString = "https://fcm.googleapis.com/fcm/send"
        let url = NSURL(string: urlString)!
        let paramString: [String : Any] = ["to" : token,
                                           "notification" : ["title" : title, "body" : body],
                                           "data" : ["user" : "test_id"]
        ]
        let request = NSMutableURLRequest(url: url as URL)
        request.httpMethod = "POST"
        request.httpBody = try? JSONSerialization.data(withJSONObject:paramString, options: [.prettyPrinted])
        request.setValue("application/json", forHTTPHeaderField: "Content-Type")
        request.setValue("key=AAAApGSLQJc:APA91bG-ibWUznAImUmsdmJG6NsZVXy8KgGazESfVwSRXx3xT9Zw060Jdp6wOlB7konATcugJX2Oje1PaELf3HplGf1SsQE-QiAw0Gl4VnPCfwzT0woK3P_RzT3ehGSFbgafJUw-RYG3", forHTTPHeaderField: "Authorization")
        let task =  URLSession.shared.dataTask(with: request as URLRequest)  { (data, response, error) in
            do {
                if let jsonData = data {
                    if let jsonDataDict  = try JSONSerialization.jsonObject(with: jsonData, options: JSONSerialization.ReadingOptions.allowFragments) as? [String: AnyObject] {
                        NSLog("Received data:\n\(jsonDataDict))")
                    }
                }
            } catch let err as NSError {
                print(err.debugDescription)
            }
        }
        task.resume()
    }
}
Please notice that you need to replace the Authorization header with your own server key. You can get that from Firebase Console -> Project Settings -> Cloud Messaging. And that’s it. All you need to do to send a notification from an iOS device to another iOS device (for which you know the push token) is this:
let sender = PushNotificationSender()
sender.sendPushNotification(to: "token", title: "Notification title", body: "Notification body")
Easy, right? This is assuming you know the push notification token. But that’s easy to retrieve for any user because you’ve stored the push tokens in the users_table in Firestore, each time a user accepts the push permissions dialog.
Looking for a custom mobile application?
Our team of expert mobile developers can help you build a custom mobile app that meets your specific needs.
Get in TouchYou can download our open-source Firebase Push Notifications Starter Kit to bypass all these steps. Regardless, you still need to configure your own Apple certificates as well as Firebase projects to be able to send your own notifications.
Before submitting to the App Store, make sure you generate a production certificate and upload the .p12 file to Firebase.
Was this tutorial useful to you? Please let us know in the comments, star our Github repo, and consider sharing the article to other people who might need it.