Introduction to SwiftUI And The Future of iOS Development
SwiftUI is a newly released framework to help iOS developers build user interfaces across all Apple platforms with the power of Swift. SwiftUI has been launched at WWDC 2019 and has been increasing in popularity exponentially ever since. SwiftUI addresses the major pain points that iOS engineers were facing with building interfaces, and for these reasons, SwiftUI is the future of front-end development on iOS. We are making a quick introduction to SwiftUI to highlight its simplistic yet powerful paradigm.
“SwiftUI, SwiftUI and SwiftUI” – SwiftUI’s everywhere. Almost all iOS developers are currently learning this incredible framework, making tutorials about it or searching and collecting all the related documentation. So what is SwiftUI exactly? Why is it so attractive? Does it completely replace UIKit? We are going to be answering all these questions in this article as well as also making some demos and explaining everything to you. Stay tuned.
1. What is SwiftUI?
SwiftUI is a new UI framework developed by Apple. It provides a completely new API allowing you to write code on all Apple platforms (iOS, iPad OS, watchOS, and tvOS) and it’s supported on Xcode 11.0+Beta, iOS 13.0+Beta, macOS 10.15+Beta. You can use it across all Apple platforms by just writing code once.
SwiftUI is a Declarative UI, completely different from the legacy Imperative language (in a nutshell, Declarative programming is what you want, and imperative language is how to get what you want). Based on this difference, it’s going to be eliminating Interface Builder XML (a.k.a storyboards, yes!). Therefore, less code with better architecture.
Even better, SwiftUI enables us to create a two-way connection between a view and its underlying model with one or two characters, called Binding.
However, it’s still quite new (at the time when we’re writing this article, it is still in beta) and we think it will take a long time for SwiftUI to become perfect. But trust us, soon enough, that day will arrive. Besides, you must know that the SwiftUI framework only supports iOS 13+, so think twice before adopting it in your company’s codebase.
Ok, enough talk! Let’s do some demos.
Mega Bundle Sale is ON! Get ALL of our React Native codebases at 90% OFF discount 🔥
Get the Mega Bundle2. Getting Started with SwiftUI
a. Set up your SwiftUI environment
First of all, you need to install Xcode 11.0+Beta (or Xcode 11.0+ later), then create a new project as usual.
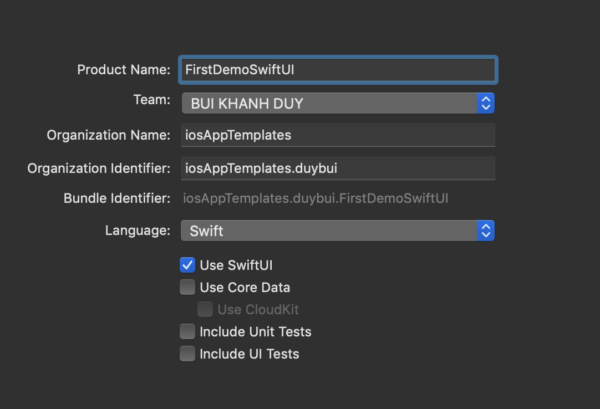
As you can see, like Core Data, you can decide whether you use it. After you’re done, let’s check out the project navigator. We have two files: AppDelegate.swift and SceneDelegate.swift (if you remember, AppDelegate.swift was the only file created before)

Is there anything interesting inside our new friend – SceneDelegate? The sad news is nothing much except this line of code:
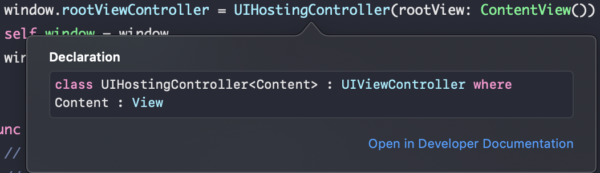
window.rootViewController = UIHostingController(rootView: ContentView())
UIHostingController is seen as a bridge to connect SwiftUI and UIKit in case you want to use both frameworks. It has inherited from the UIViewController class so we can do something like pushing or presenting. And then you can call your SwiftUI View inside.
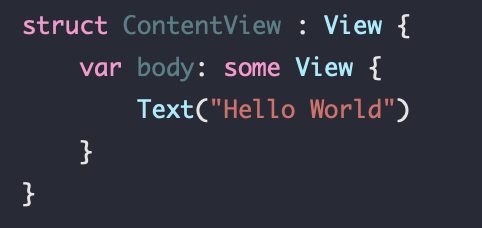
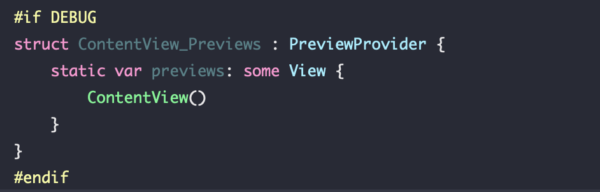
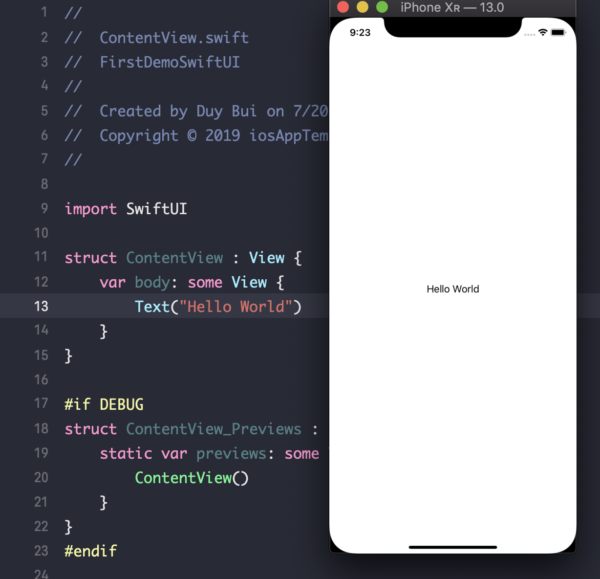
That’s all about the new structure. Let’s continue with the main point today. Click on ContentView.swift file. There is a struct conforming to the View protocol, called ContentView. And its inside is where you will implement the UI (For example, Apple gave us an example: Text(“Hello World”))
If we scroll down, we will see this block of code. It contains support for previews (used for live reloading), and in this article, we will skip this section since there is not much to say about it.
Now, run the code and see what happens
Mega Bundle Sale is ON! Get ALL of our React Native codebases at 90% OFF discount 🔥
Get the Mega Bundleb. Write Your First SwiftUI Code
Let’s change the code inside the body as follows and run the SwiftUI project to see what it looks like first:
var body: some View {
      VStack(alignment: .center, spacing: 30) {
        VStack {
          Text("iOS App Template").color(Color.red)
          Text("Premium functional iOS app templates")
          Text("Make your own iOS apps in just a few hours")
        }

        VStack(alignment: .leading, spacing: 20) {
          Text("E-Commerce App")
          Text("Dating App")
          Text("Booking app")
        }

        HStack(alignment: .center, spacing: 70) {
          Text("Free").font(.system(size: 20)).color(Color.blue)
          Text("Premium").font(.system(size: 20)).color(Color.green)
        }

        Button(action: {
          print("Thanks for your support")
        }) {
          Group {
            Text("Buy Now").color(Color.blue).padding(12)
            }.clipShape(RoundedRectangle(cornerRadius: 10))
            .shadow(radius: 10)
        }
      }
    }
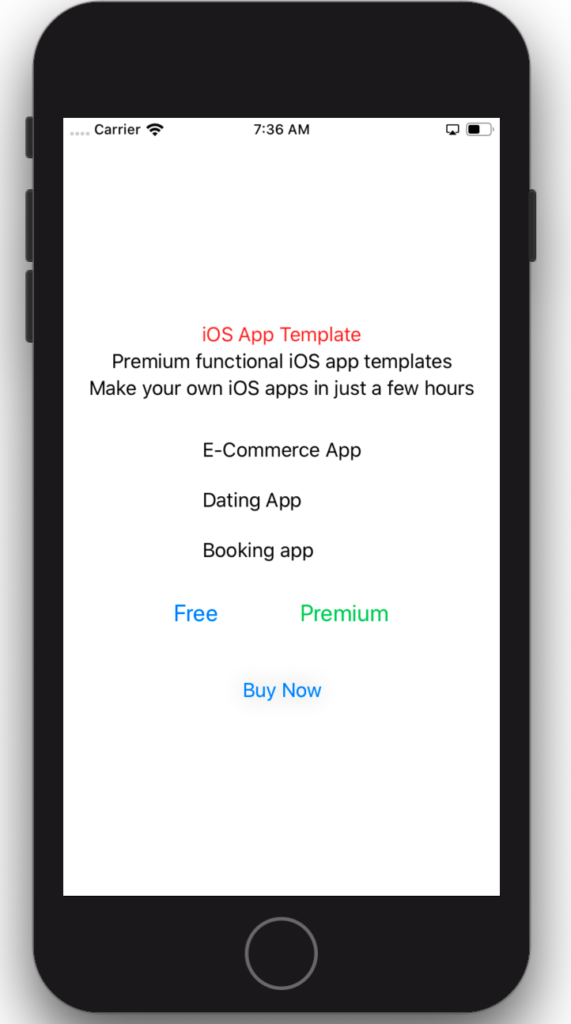
The most impressive thing about SwiftUI is that even from the code section, we can also immediately imagine how our UI will be organized.
- VStack is the vertical stack and HStack is the horizontal one. You’ll notice that the parent vertical stack is placed at the center of the screen, with all child components being centered. For each stack view, you can either leave the automatic space and the default alignment or configure them as you wish.
- Text is a label which you can edit, update its attributes by calling the API as in the example.
- the Button consists of two parts, the first part is the action and the second one is the place you’ll update the UI of that button. Pay attention if you want to update the UI of a view, you should embed it inside a component called Group (which acts as a container view).
c. @State, $ – Two-way binding
Let’s add some lines of code into our biggest stack view.
 @State var firstName = ""
  @State var lastName = ""

    var body: some View {
      VStack(alignment: .center, spacing: 30) {

        VStack(alignment: .center, spacing: 20) {
          Group {
            TextField($firstName, placeholder: Text("First Name"))
              .padding(12)
              .background(Color.white)
            }.clipShape(RoundedRectangle(cornerRadius: 10))
          Group {
            TextField($lastName, placeholder: Text("Last Name"))
              .padding(12)
              .background(Color.white)
            }.clipShape(RoundedRectangle(cornerRadius: 10))
.
.
}
Firstly, we’re going to declare two variables in SwiftUI. So what is the @State prefix in front of var? If you want to update the UI whenever the value of a variable changes, you need to use it as a @State variable.
SwiftUI’s TextField relies heavily on binding to state. To create one, we assign to it the state variable to bind the value of the variable with the UI text field element.
When users type in some text, the textField will change, and at this time, we also want the property inside to change, in order to stay in sync. This is what’s called a two-way binding, so everything stays in sync. In short, when we change the variable, the text field will be updated and vice versa, when the text field changes, that binding variable will also be updated. And all of this is done via @State and $. So yes, there’s no more complicated Redux code.
Mega Bundle Sale is ON! Get ALL of our React Native codebases at 90% OFF discount 🔥
Get the Mega Bundled. @ObjectBinding
After we’re done with the properties, the next step is to bind an object. Create a new class as follows
class WebService: BindableObject {

  var didChange = PassthroughSubject<Void, Never>()
  var webLink = "http://www.iosapptemplates.com" {
    didSet {
      didChange.send(())
    }
  }
}
At first, our class needs to conform to BindableObject protocol. In general, to use the @ObjectBinding property, it’s required to conform to BindableObject.
A PassthroughSubject is considered as a speaker since it’ll emit announcements of changes to anyone who is listening.
var didChange = PassthroughSubject<Void, Never>()
PassthroughSubject includes two properties: Void and Never. The first parameter is the new value you want to send along with the signal telling the view to refresh. It could be Int, String, Void, etc and even a custom object. In this case, we have nothing to pass so we choose Void.
The next one is the place to inform the error you’re running into. Currently, we’re quite confident that we have no errors, so we pass in Never.
Whenever our property changes, we call didChange.send(()) inside its didSet as in our example. It’ll ask the didChange emit the new data so so that any views which are listening to can refresh. Do you feel that it’s similar to RxSwift? Yeah exactly. The way SwiftUI and the Combine framework are operating is based on Observe and Subscriber. And don’t forget to import Combine to make your code compile successfully.
Let’s continue with our main ContentView. At the place where we declare the Variables, add one more
@ObjectBinding var webService = WebService()
In the Vstack containing the text fields, we create a text field like this:
TextField($webService.webLink, placeholder: Text("Website"))
              .padding(12)
              .background(Color.white)
            }.clipShape(RoundedRectangle(cornerRadius: 10))
Use the @ObjectBinding property in front of webService and then use $ for any properties belonging to webService (for example, $webService.webLink). Pay attention to listen to these changes on the main thread since it will affect the UI.
e. What’s Next?
Basically, with @State and @ObjectBinding, we handled almost everything. But, we still have a property called @EnvironmentObject. They more or less look the same. And since this article is super long and this property is also quite advanced, we’ll leave this one to you.
Also, there are a lot of components waiting for you such as List (TableView), Navigation View, Image, etc. Our recommendation is to build a more advanced starter project to get familiar with all these new components. It’s super exciting to see that building UI is finally fun in iOS development as well.
4. More UI Enhancements
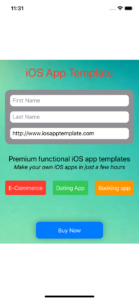
In SwiftUI, you can add a border to a text field with a simple line of code:
.textFieldStyle(.roundedBorder)
More specifically, the code becomes:
TextField($firstName, placeholder: Text("First Name"))
              .padding(12)
              .background(Color.white)
              .textFieldStyle(.roundedBorder)
Let’s apply this line to all text fields we have currently on the screen. In addition, the space between the text fields is quite wide, so we want to adjust it a bit. In the code written here, we just show you how to do it for one component, but it should be easy for you to mimic the behavior for all the other UI elements.
Mega Bundle Sale is ON! Get ALL of our React Native codebases at 90% OFF discount 🔥
Get the Mega BundleSo here’s what we’ve done:
-
Moved the “iOS App Template” title into the top and removed “Free” and “Premium” texts
-
Bordered components
-
Added a background image Here are some attributes for you:
-
.cornerRadius() -> Add the corner radius number as you wish, for example: .cornerRadius(15)
-
.background(Image(“images”)) -> Add this attribute to the biggest view in body.
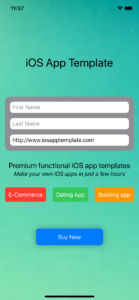
Now, let’s run it and see the magic
Looks nice, right? Let’s go one step further and adjust the spacing a bit. To use the Image component as the background view for the root element, we need to use Spacer() in two places:
var body: some View {
    VStack(alignment: .center, spacing: 30) {
      Spacer()
       /*... Content inside...*/
       {...}
      }
      Spacer()
    }.padding(15)
      .background(Image("images").resizable().scaledToFill())
          .edgesIgnoringSafeArea(.all)
  }
.edgesIgnoringSafeArea(.all) -> This property enables us to ignore all of safe area edges. You can also ignore a specific edge if you want. Now let’s run again.
Moreover, the syntax is so similar to Flutter and React Native, you can also approach these languages easier and vice versa.
And last, we guess that these two frameworks could operate in parallels like Objective-C and Swift.
Looking for a custom mobile application?
Our team of expert mobile developers can help you build a custom mobile app that meets your specific needs.
Get in TouchConclusion
Hopefully, by this point, you’d agree that SwiftUI is a game changer. The programming paradigms behind it are not brand new. In fact, they were invented by Facebook when React came out. The Combine framework enhances the state binding paradigm, by borrowing concepts from RxSwift. But this is revolutionary for Apple platforms, and we, as iOS developers, cannot be happier.
To sum up, SwiftUI:
- A declarative UI framework, which is the future of Apple front-end development
- Will kill Storyboards, and eventually, UIKit
- Will kill RxSwift (via Combine)
- Made front-end development on iOS fun
- (Prediction): Will enable designers to create user interfaces directly in Xcode. Developers won’t need to worry about front-end code anymore.
Thanks for reading this and here is the source code.