In this article, we are going to discuss how to set up our Dashboard iOS App Template, and how to make further customizations in the Swift source code, so that your final app will be unique. Our product is a fully functional app, with complete source code, on top of being a beautiful iOS Dashboard Design Template.

First of all, you need to build & run the downloaded Swift project in Xcode. To run our templates in Xcode, please follow this article on how to run Xcode projects. Keep in mind that we are using Cocoapods, so you need to install the pods first (by running “pod update”), otherwise, the project won’t work.

Secondly, once you have your Xcode project up and running, you need to wire up your own Firebase account. By default, the downloaded project uses our test Firebase account, so follow this Firebase Integration tutorial to see how to replace the Google Info plist file with your own.

ios dashboard design template

Once you set up everything, including Firebase, it’s time to make further customizations. Here are a few key principles that you should know before diving into the source code.

ATCDashboardHostViewController

This is the main class of the app, hosting the main view controller. You will modify this class if you want to:

  • Change the navigation from tab bar to a sidebar (Line 75)
  • Change the order of the main screens, add/remove screens
  • Customize the main menu (Line 37)

DashboardUIConfiguration

This class contains the UI elements of the theme. This is how we do theming in iOS. To edit your app’s main UI elements, such as main colors, main fonts, navigation bar UI and menu icons, just modify this straightforward class:

dashboard ui swift

ATCDashboardMockStore

This class contains all the static data displayed in the app: orders, cards, chart numbers, walkthroughs texts, categories, notifications, feed items, customers, products, tasks, etc. Just modify these arrays to display the data you want.

Main View Controllers

The main view controllers are associated with the main screens of the app:

  • Home -> ATCDashboardHomeViewController
  • Categories -> ATCDashboardCategoriesViewController
  • Notifications -> ATCNotificationsViewController
  • Activity Feed -> ATCDashboardFeedViewController
  • Orders -> ATCDashboardOrdersViewController
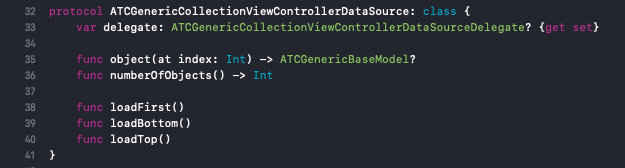
All these view controller objects are instantiated from the aforementioned host view controller. All of them inherit from your base class, ATCGenericCollectionViewController which is a powerful view controller built on top of the collection view controller offered by Apple. Besides the basic features that a regular collection view controller offers (scrolling & cell recycling), our ATCGenericCollectionViewController has a number of additional features, that you’ll find extremely useful, such as:

  • Pull to refresh mechanism
  • Pagination
  • Heterogeneous Cells

All the UI elements that are displayed in our view controllers are part of a custom cell (derived from UICollectionViewCell). The great advantage offered by our custom view controllers is that they can display data in multiple formats (various collection view cells), on the same screen. The main design pattern here is the adapter pattern. For each different type of cell that we want to display in a generic view controller, we create a model, an adapter and a collection view cell. This allows us for heterogeneous collections and maximizes code reusability.

Let’s take an example to make this easier to understand. Let’s consider the home screen of the app, which is built by ATCDashboardHomeViewController.

ios dashboard template

As you can see, in this collection view, we display multiple types of UI components: a horizontal carousel for top categories, a line chart, a horizontal carousel for money cards, and a collection of recent orders. These are collection views embedded in collection views! Let’s consider the line chart example. To add the chart you see in the image above, to the home screen, we created three different components:

  • ATCLineChartCollectionViewCell.swift & ATCLineChartCollectionViewCell.xib
    • This is a collection view cell, inheriting from UICollectionViewCell.
    • We use the Interface Builder to drag & drop all the views and specify the auto layout constraints
  • ATCLineChart

    • This is a model object, inheriting directly from ATCGenericBaseModel
    • It contains all the data of the chart, which is an array of numbers and the title (“Overview”), in our case
  • ATCLineChartAdapter

    • This is where the magic happens. This class implements the two methods required by the ATCGenericCollectionRowAdapter protocol.
    • These methods are in charge of transforming (“adapting“) a model (ATCLineChart) into a collection view cell (ATCLineChartCollectionViewCell).
    • This object is also in charge of doing extra UI configurations, which cannot be done in interface builder (e.g. downloading an image from a URL)

By structuring our code in this way, we can easily display charts in ANY view controller, by writing only one line of code. For example, on the home screen, this is how we specify what components to show and in what order:

generic collection view

If you want to move that chart at the top, just move the “chart” element up in the array, and voila. One line.

Note: We do this for all the elements we display in collection views, across all of our app templates.

Customizing the Walkthrough Flow

The walkthrough flow consists of a series of screens that are informing your users about your app. The flow only shows up once, when the users open the app for the first time. You can customize or remove this walkthrough flow easily.

To remove the walkthrough flow, just replace Line 85 in ATCDashboardHostViewController, from

return ATCHostViewController(configuration: config, onboardingCoordinator: onboardingCoordinator, walkthroughVC: walkthroughVC, profilePresenter: nil)

to

return ATCHostViewController(configuration: config, onboardingCoordinator: onboardingCoordinator, walkthroughVC: nil, profilePresenter: nil)

To customize, add or remove walkthrough screens, head over to ATCDashboardMockStore.swift, and modify the array describing all the screens:

admin panel template ios

Customizing the Landing Screens

To customize the sign in, sign up and landing screens, check out the onboardingCoordinator in  ATCDashboardHostViewController. As you can see, it takes a DashboardOnboardingUIConfig object, that contains all the UI elements needed for the logged out screens (colors, fonts, etc).

Here, you can also change the icons, fonts, colors and texts for the landing screens. Just modify the parameters below:

ios charts app

Displaying Data from A Remote Server (REST API, Firebase, etc.)

A common scenario is when you want to display data that comes from a REST API that you have. In many cases, you already have some data for your business on a server, so you want to fetch & display it into the iOS dashboard app.

Our code is built just for that. As we promised, our app template is more than just an iOS Design Kit – it’s a complete app. If you read carefully, our generic view controllers support any type of data sources. In fact, they only deal with a protocol data source, that has 5 simple methods:

protocol data source

All you need to do to add your own server data feed is to create a class that conforms to this protocol.

By default, our dashboard template uses a static data source, taking data from hardcoded arrays. It’s called ATCGenericLocalHeteroDataSource and it looks like this (use it as inspiration for your own data source making API calls):

ios dashboard app

Now, let’s say you want to fetch the categories from a remote REST API, and you’ve implemented a RESTfulAPIDataSource class of your own, that is making API requests to retrieve the categories from your own backend. To display these categories into ATCDashboardCategoriesViewController, open it, and change the line

let dataSource = ATCGenericLocalHeteroDataSource(items: ATCDashboardMockStore.categories)

into

let dataSource = RESTfulAPIDataSource()

That’s it. One line. Amazing, right? You also get pull to refresh & pagination out of the box. Pretty cool, I hope.

Frequently Asked Questions

1. How Do I Disable Firebase?

If you don’t want to use Firebase, the good news is that you can turn off the integration with a simple line of code. Head over to DashboardUIConfiguration.swift and change the isFirebaseAuthEnabled variable to false.

This will work. Of course, ideally, you’d remove Firebase from the Podfile too, and all the files that are using Firebase, to clean up the unused code, but this is optional, and we recommend you to do it only if you know truly what you’re doing.


Shopping Cart